
Selling computers and maximizing profits with up-selling can be challenging. In this guide, you'll learn how to add products to WooCommerce. Then, I will show you how to use a free plugin to customize the WooCommerce product page. You will see a WooCommerce computer builder with a MacBook Pro as an example. In the end, you will be ready to sell customizable products in your WooCommerce store and make more profit.
➡️ Do you find WooCommerce poor in options or overcomplicated when adding products?
Today, I'll show you how to add products and customize them in your WooCommerce with a free plugin!
Contents
- How to add WooCommerce products - Quick guide
- Customize WooCommerce products - computer builder example
- Customize the WooCommerce computer builder product page
- Customize WooCommerce products with custom fields
- Summary & more about the plugin
- WooCommerce product personalization with a free plugin!
- WooCommerce advanced custom fields: a FREE product & checkout customizer
- Create Custom Fields in WooCommerce Checkout and Product Pages
- WooCommerce Products - The basics of e-commerce product management
- 25 eCommerce Tips to eCommerce Personalization: Customize WooCommerce Product Page in 2026
All Plugins Bundle
20 plugins included! 1 Site for each plugin Regular updates and support Priority 1-on-1 Support 30-day money back guarantee
Download for free or Go to WordPress.orgHow to add WooCommerce products - Quick guide
Let's see how to create products in a few steps:
-
Products in WooCommerce
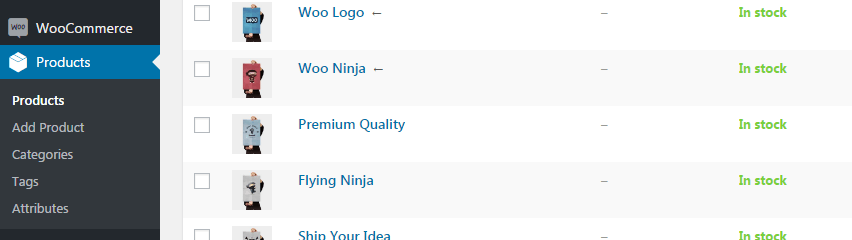
WooCommerce Products List First, go to the Products menu to add, remove, and manage your items.
-
Add or edit a product
Then, click the Add new button or edit the existing product.

Edit WooCommerce products -
Set the WooCommerce product
Now, choose the product name, its description, and an image. Also, go to the Product data section to decide on price, stock, attributes, tax, etc.
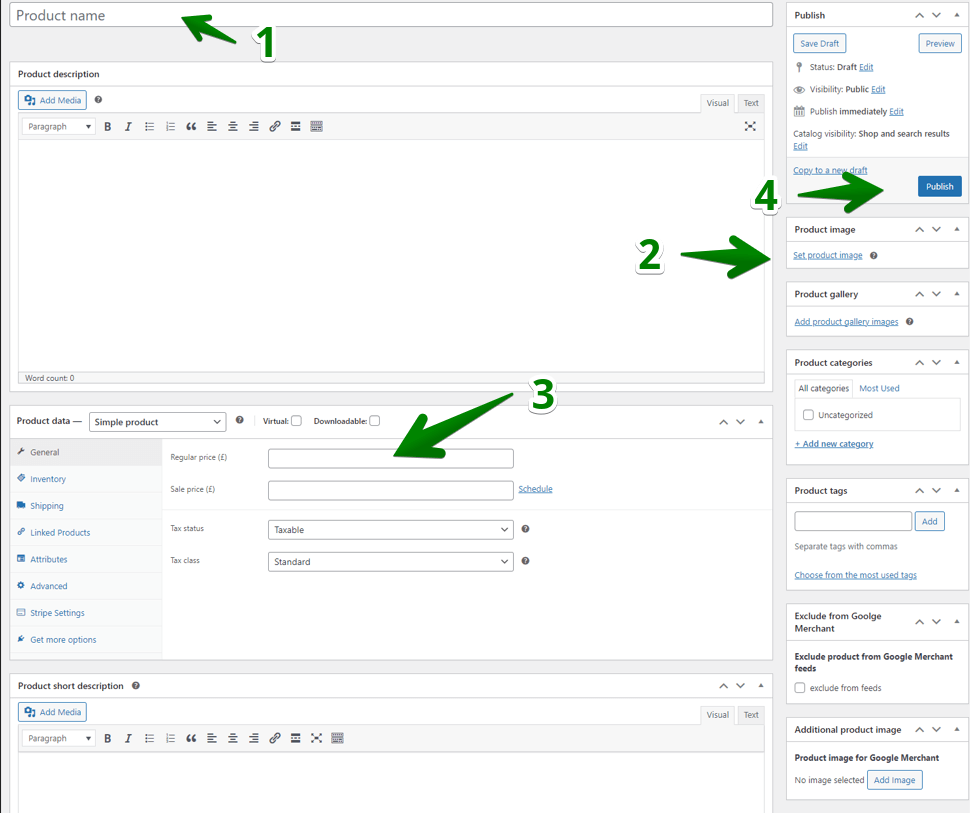
How to add WooCommerce products in a few steps Then, publish the new product (or update the existing one). That's it! 😁
-
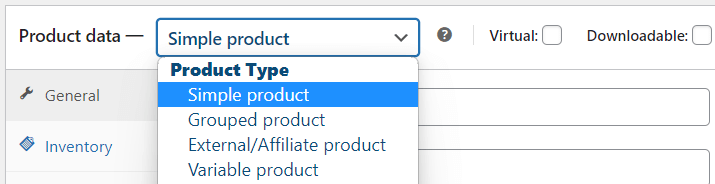
Choose the product type
You may also choose the product type:
WooCommerce product types -
👉🏽 Of course, there are a lot of additional things you can set up, like the product category or tags to better organize your items. I would like to point out that you can also quickly edit some product data faster with the Edit option on the main Product screen:
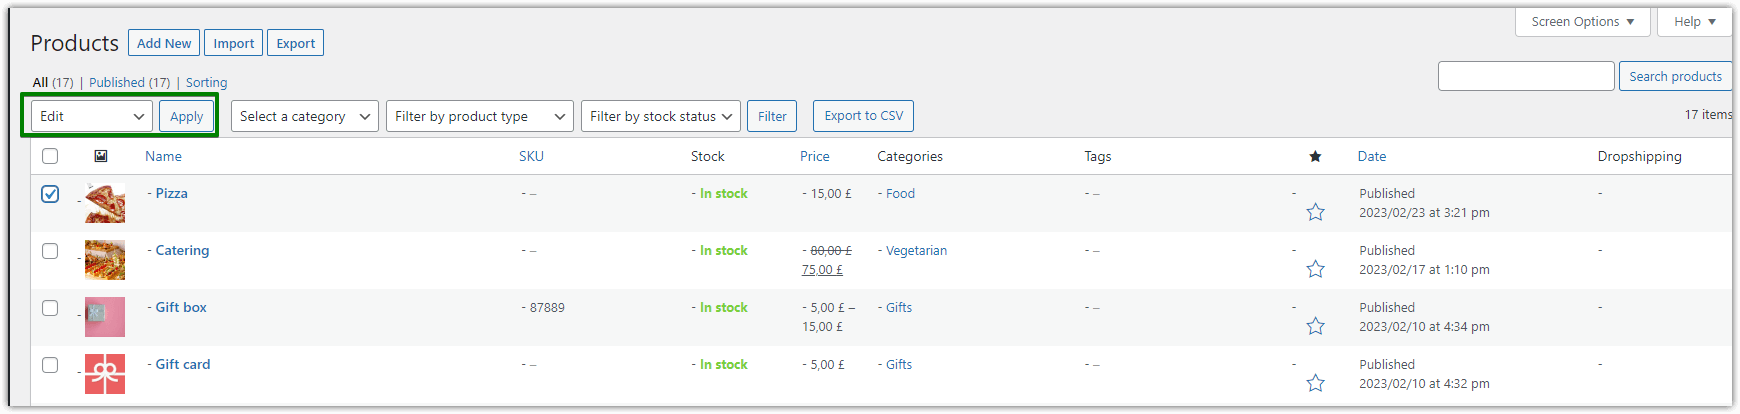
Edit WooCommerce products -
How to customize products in WooCommerce?
➡️ I think you're ready to add products. Thanks to the WooCommerce product builder you can prepare products and use additional data (like attributes, tags, and the product gallery).
In the next part, I will show you how to customize WooCommerce products with custom fields to offer much more!
Customize WooCommerce products - computer builder example
Have you ever been on Apple's website? In general, they let you choose the components of a computer that you want to buy.
As I mentioned, I decided to use a MacBook Pro 💻 as an example for this guide. We will work on a real example at this point.
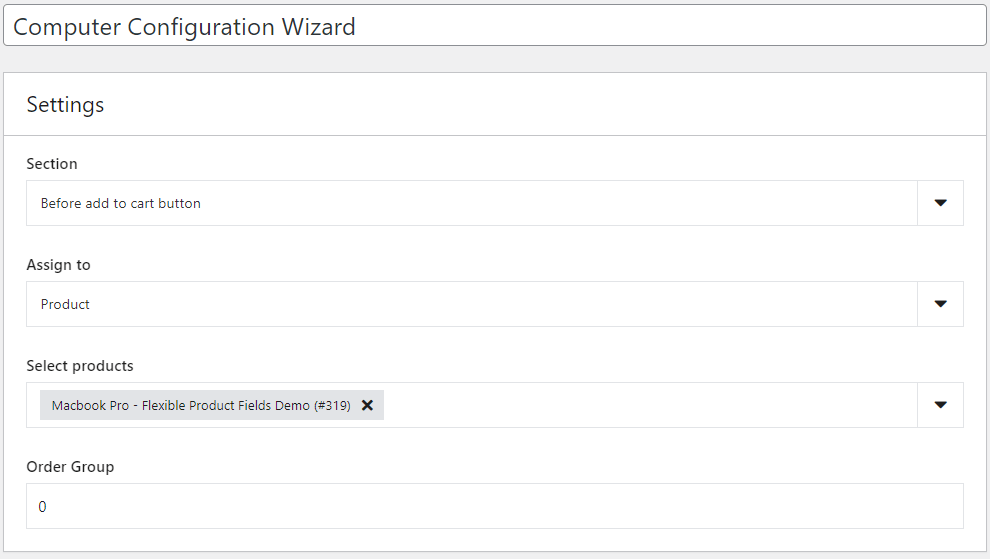
Basically, this is what their wizard looks like:
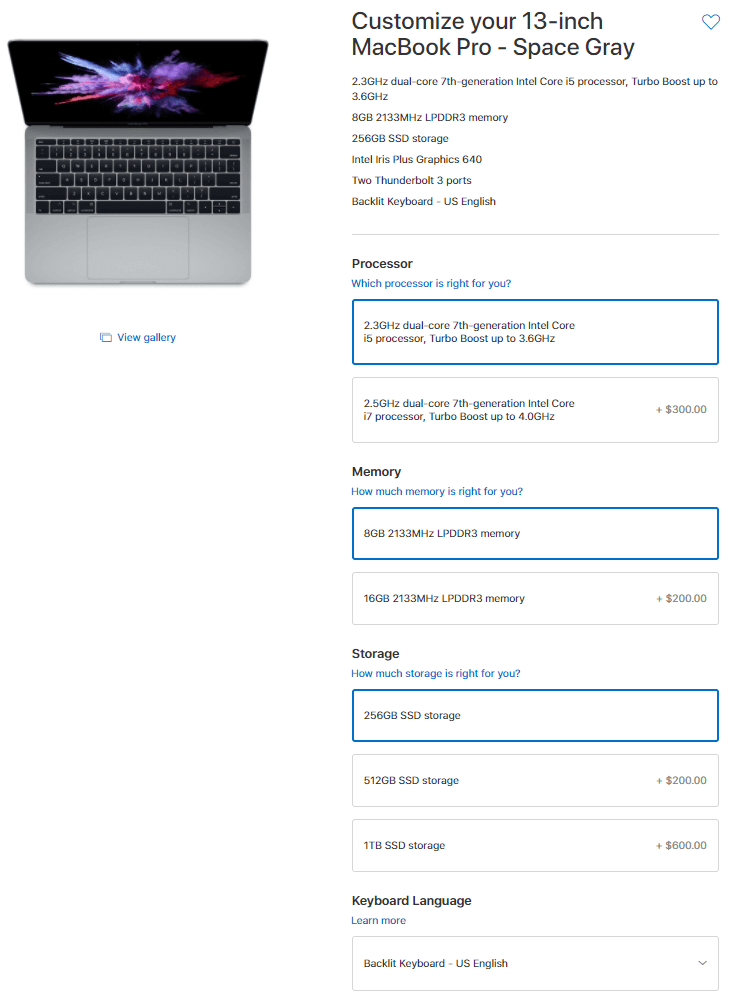
We will configure the wizard options identically in this guide to create a WooCommerce customizable product - your computer builder.
It will look like this once we configure it:
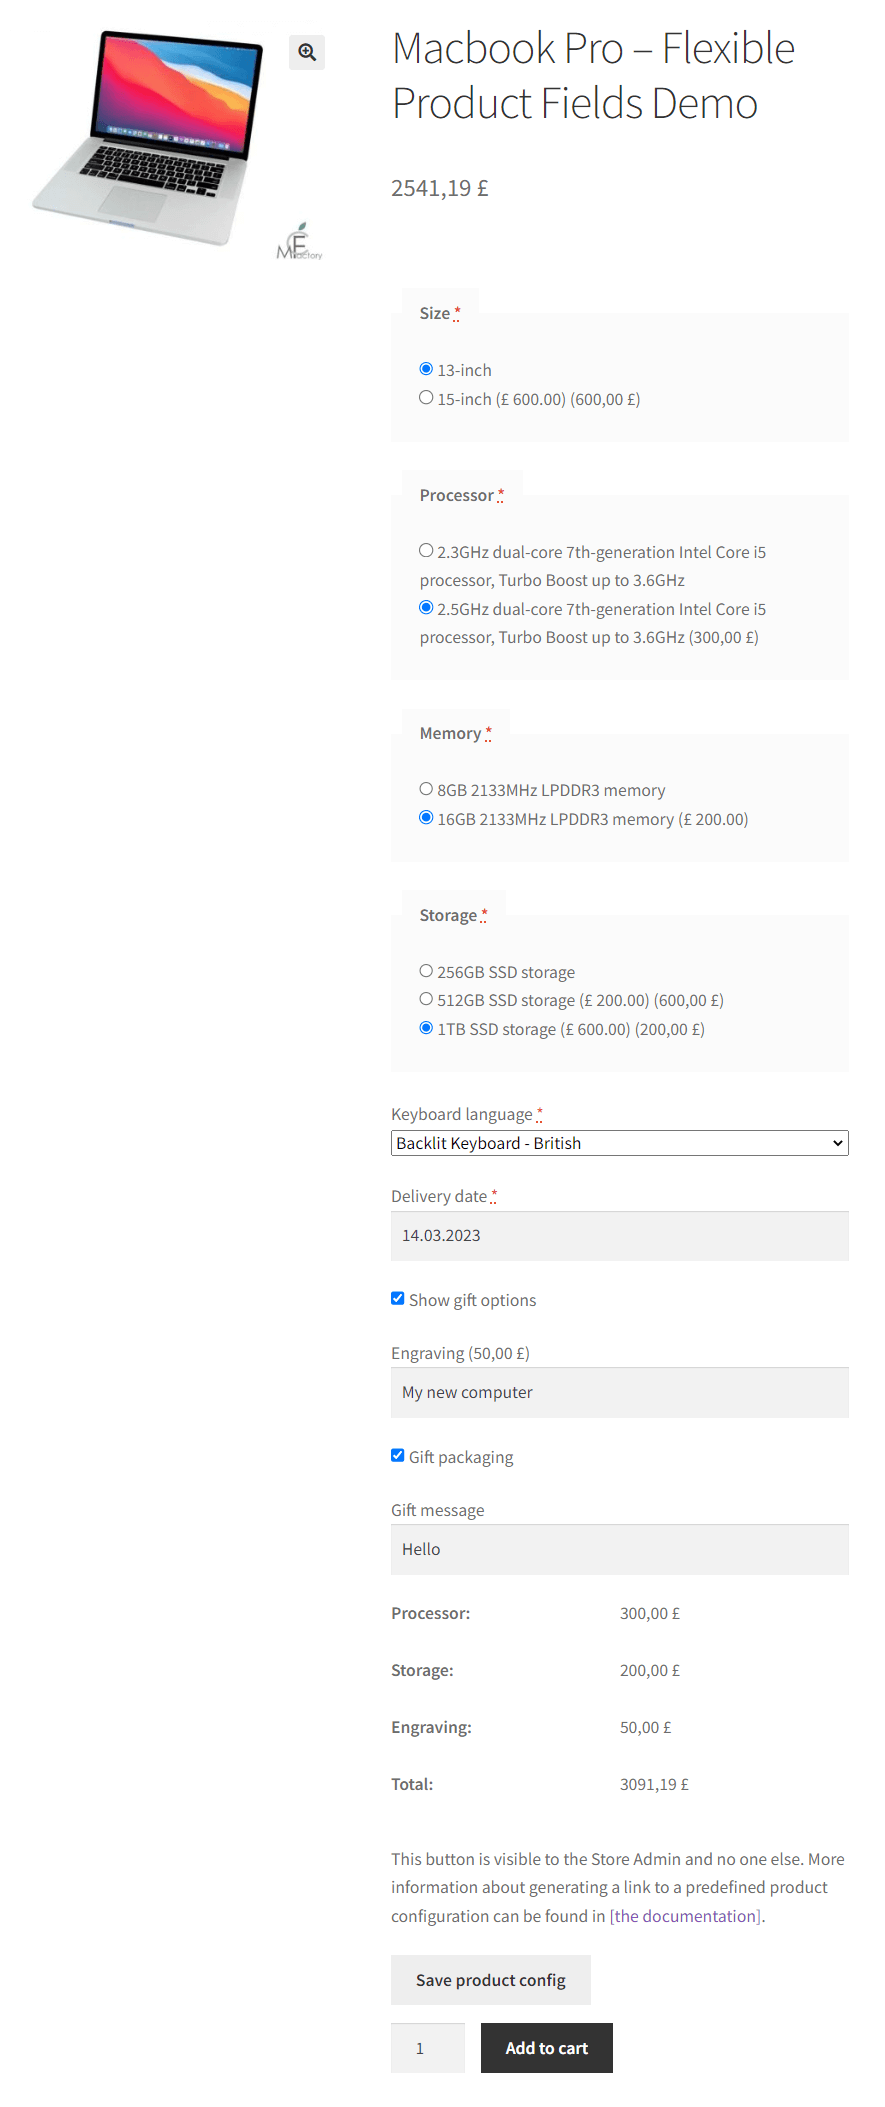
It doesn't look exactly like the one on Apple's website obviously😉 . This is the basic configuration just to demonstrate to you how it works.
👀 Look at another thing I want to show you before we go next:
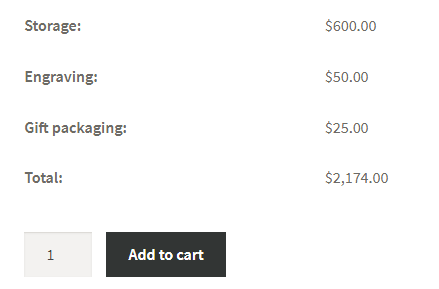
This calculator shows up when you select an option in the WooCommerce computer builder.
Customize the WooCommerce computer builder product page
1️⃣ First, you need Flexible Product Fields, our plugin enabling store owners to add custom fields and add-ons to WooCommerce products (and optionally charge for them). We will use this plugin in this guide.
All Plugins Bundle
20 plugins included! 1 Site for each plugin Regular updates and support Priority 1-on-1 Support 30-day money back guarantee
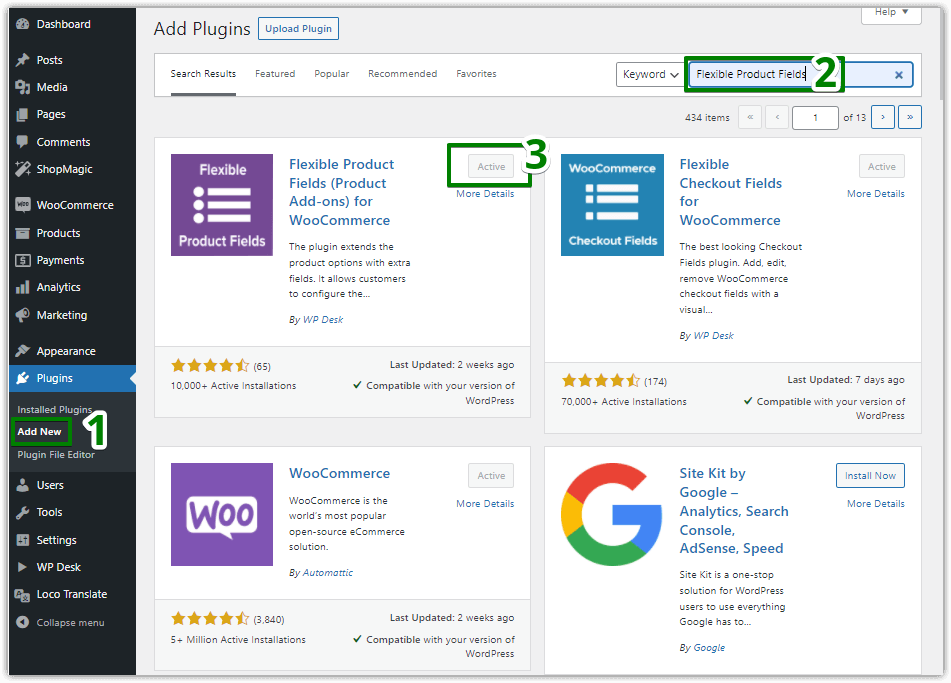
Download for free or Go to WordPress.orgYou can download it for free from WordPress.org or install it right from your store's plugins section searching for flexible product fields:
➡️ To cover all the use cases that we discuss here, you will need the PRO version of the plugin. In short, the free version doesn't offer you to charge customers for additional options. However, you can check out if the extra fields method fits your needs.

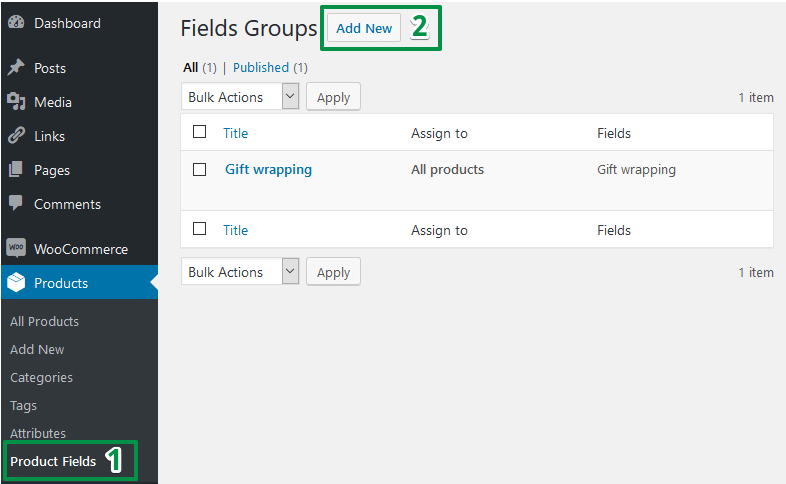
➡️ Once you've installed the plugin, let's configure it. Choose Products → Product Fields in your WordPress menu (1). Then you need to add a new field group (2):
Customize WooCommerce products with custom fields
Finally, we reached the fields configuration section🎉. I want this article to be easy for you, therefore, I will guide you step by step. Soon, you will be able to create a MacBook wizard in your store by yourself.
The overall configuration of our WooCommerce computer builder looks like below:

It may look overwhelming to you, but don't worry. As I have noted, I'll guide you step by step through the configuration to customize the WooCommerce product page with new fields. Let's begin then!
Main settings
In the section settings, you can choose where to display the fields on the product page.
Then you can assign this group to:
- a selected product(s),
- all products in your store,
- or selected categories.
👉🏽 At this point, I assign the fields to a product (MacBook Pro). It is the only option available in the free version. You could use assignment to a category, e.g. computers, in your store. In this case, you will need the PRO version.
Finally, look at the order option. If you add more than 1 field group to a product you can set the display order of them.
Add fields
The next step is to add new product fields to our WooCommerce computer builder. You have probably already noticed add-ons list. You will have to add them one by one.
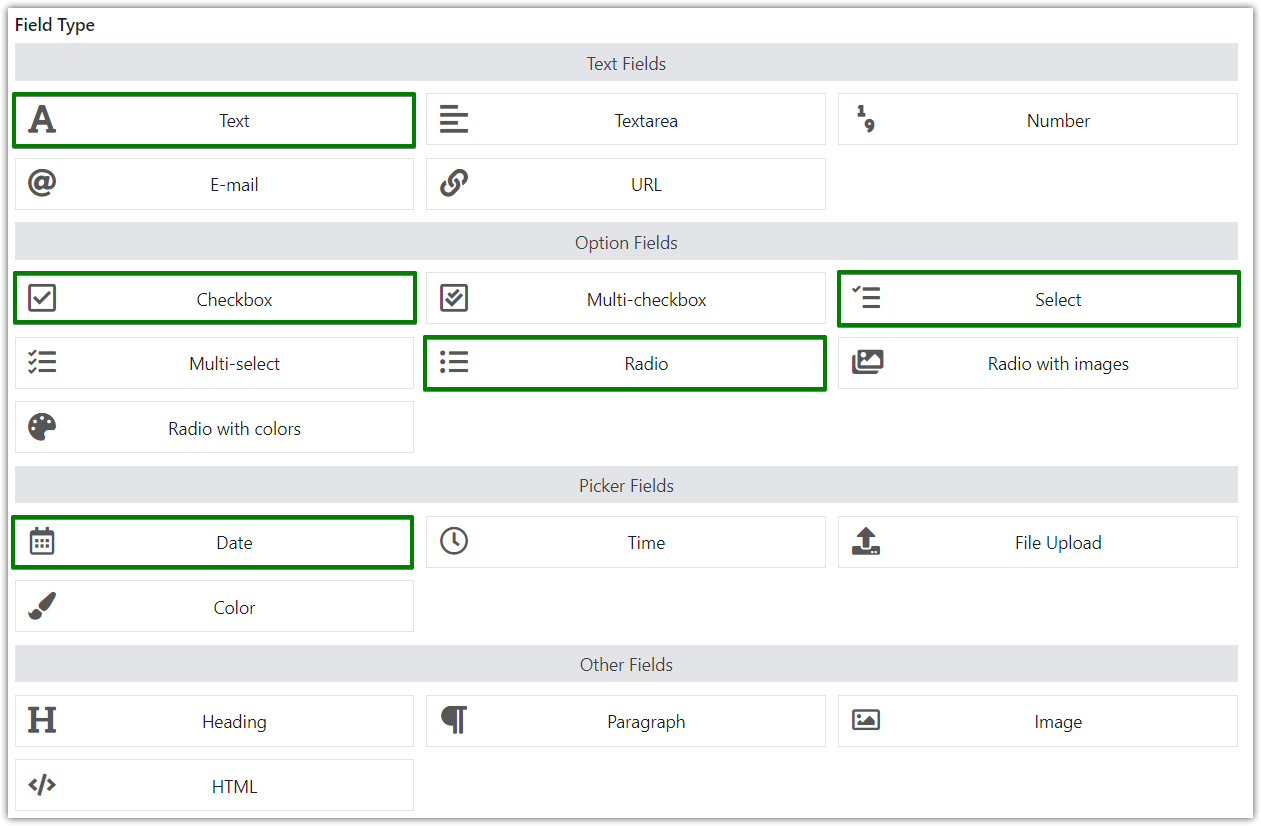
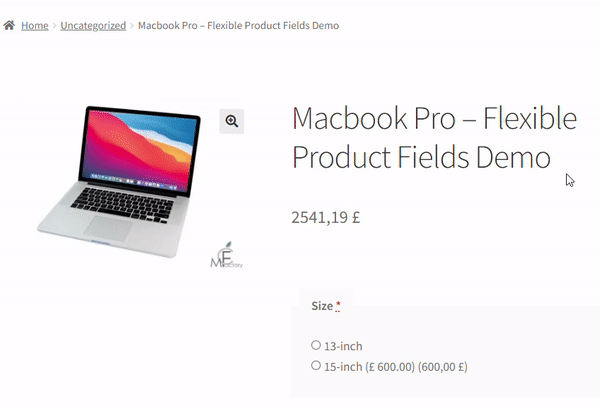
Size (radio field)
In order to offer size variations, you need to configure the radio field.
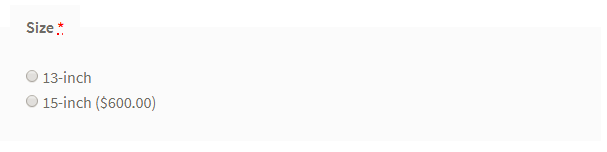
First, enter the field's name in the Label. Then select Radio from the Field Type. Required is the next option. You should use it or a customer will be able to make the order without selecting a size. How would you know what size they need then?
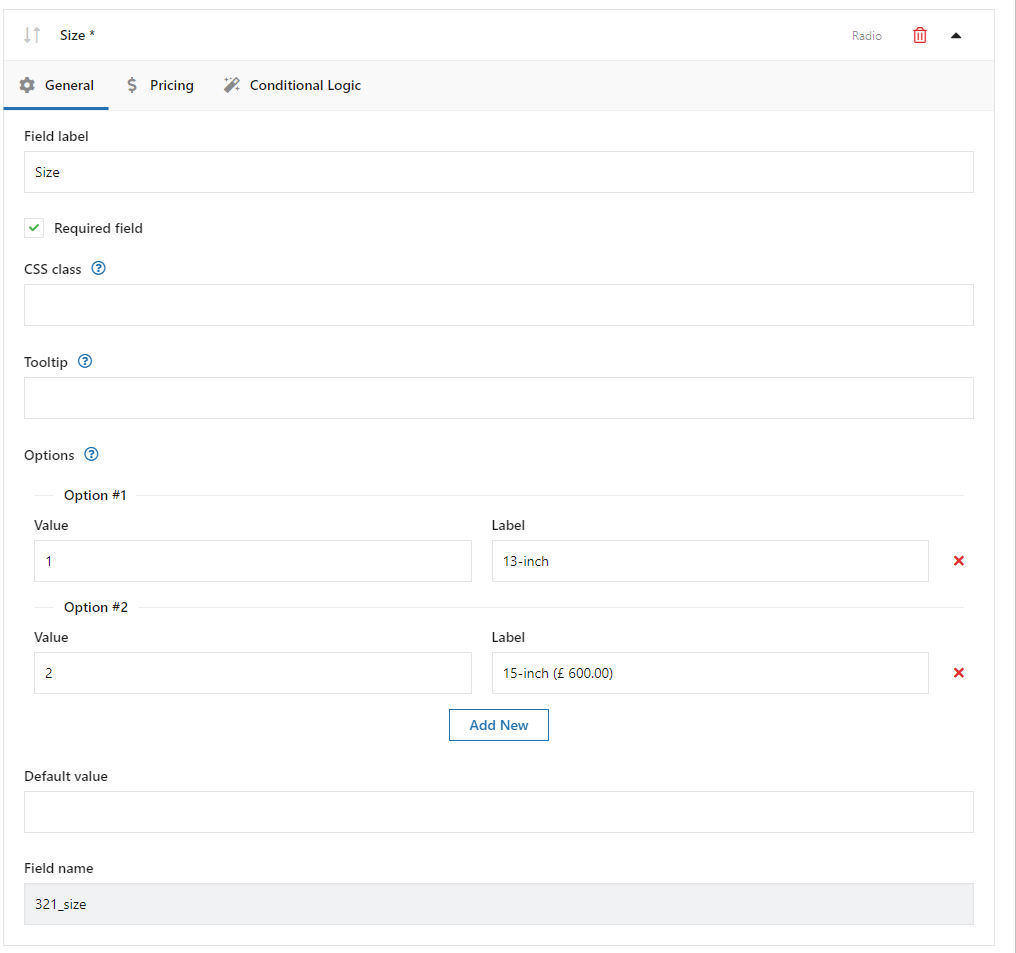
Sooner or later you may want to style the fields in your way. There's the CSS Class option to use in this situation.
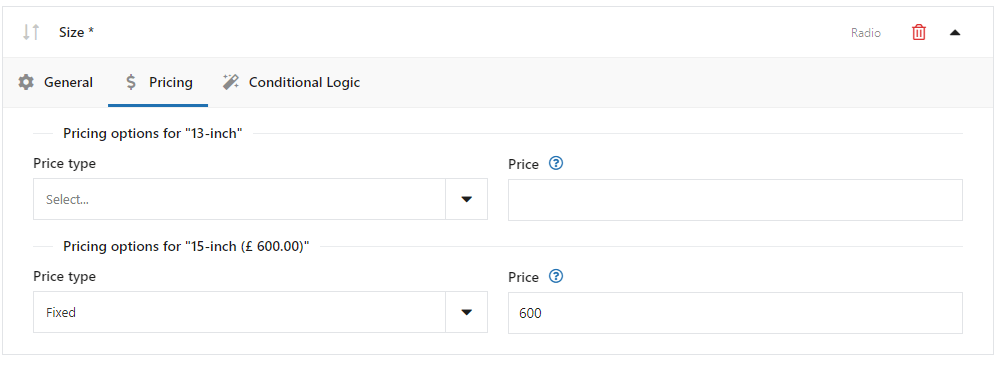
👉🏽In the Options section, you can finally configure the sizes you want to offer in your shop. In this case, we use 13-inch and 15-inch sizes. The second one costs $600 more. This is how you set it: go to the Pricing tab and add extra prices:

We don't use Conditional logic, the last option. However, we will use it later in our WooCommerce computer builder.
Processor (radio field)
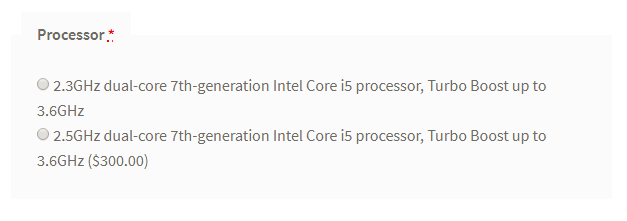
The Processor is also a radio field, you can configure it the same way as the Size field. The same goes for adding an additional price to selected options.
While in the Size both value and label were the same, we use different values and labels here. Value is only visible for store admin and stored in the database. The Label is visible to customers on the product page.
Memory (radio field)
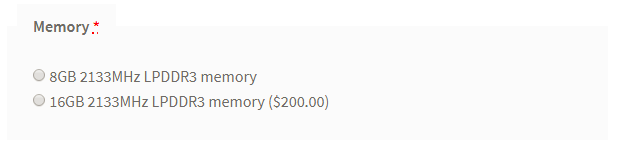
This time you know it all😉. You just need to provide memory options to our WooCommerce computer builder. Proceed in exactly the same way as in the previous steps.
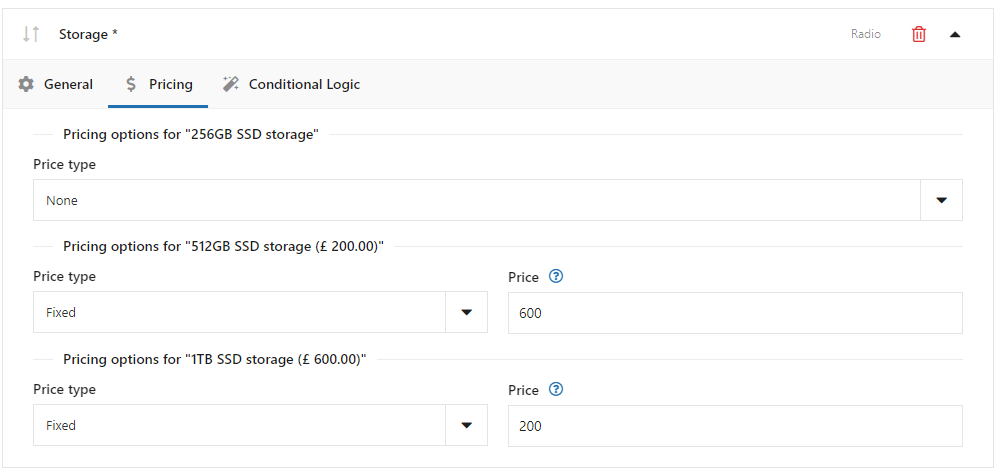
Storage (radio field)
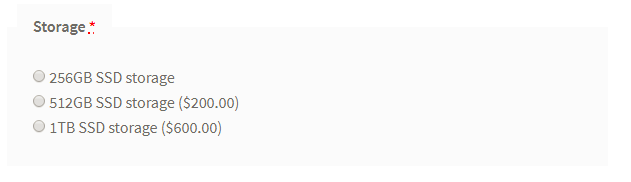
You already know how to configure this radio field 😉 The only difference is that you'll have to add 2 additional prices. Look:
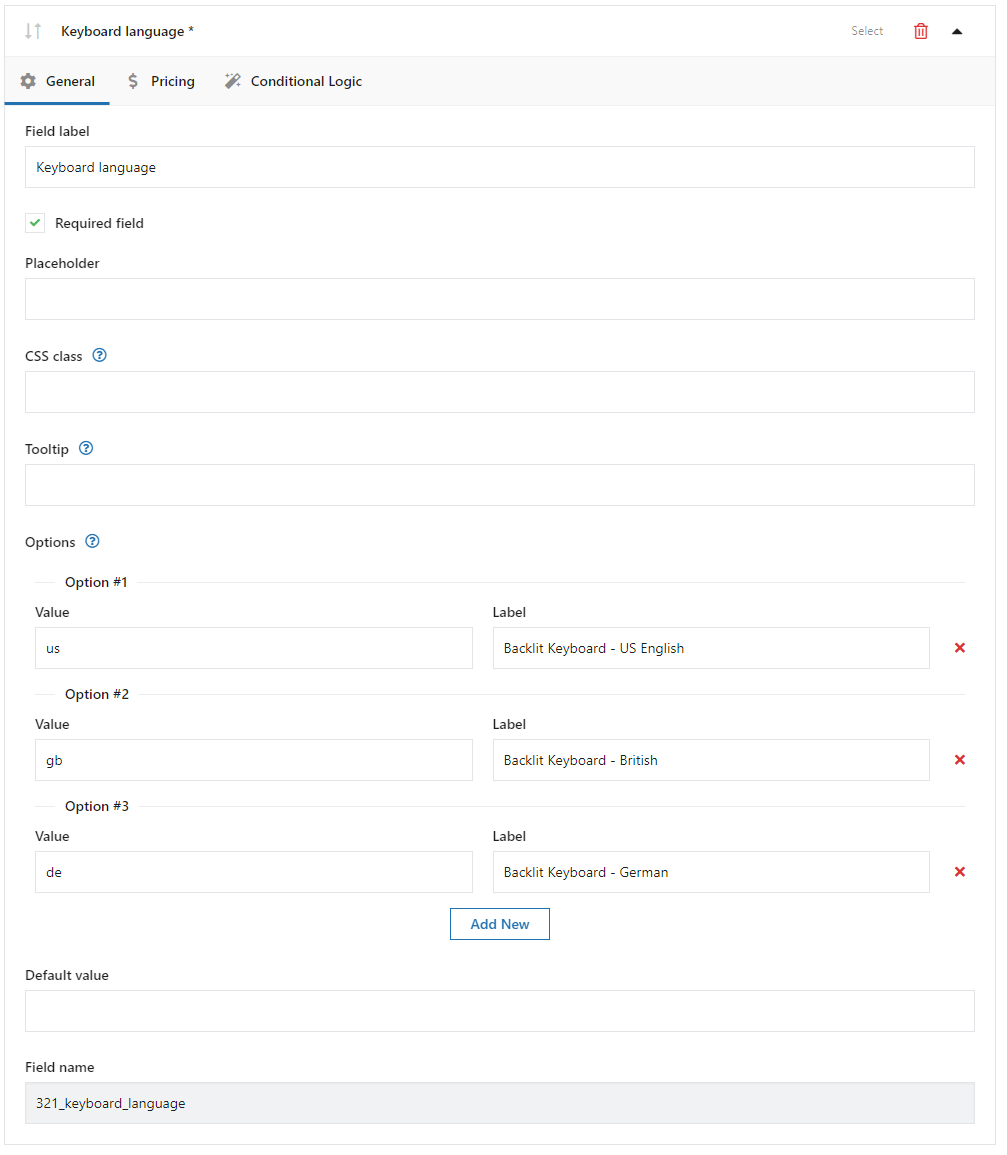
Keyboard language (select field)

This time you will configure a new type of field: select field.
The configuration is very familiar to the previous one. The main difference is the Select in the Field Type.
Delivery date (date field)

Here you can see another field type. This is the date field. The general settings are quite similar to the previous ones but there are some additional features in the Advanced tab:
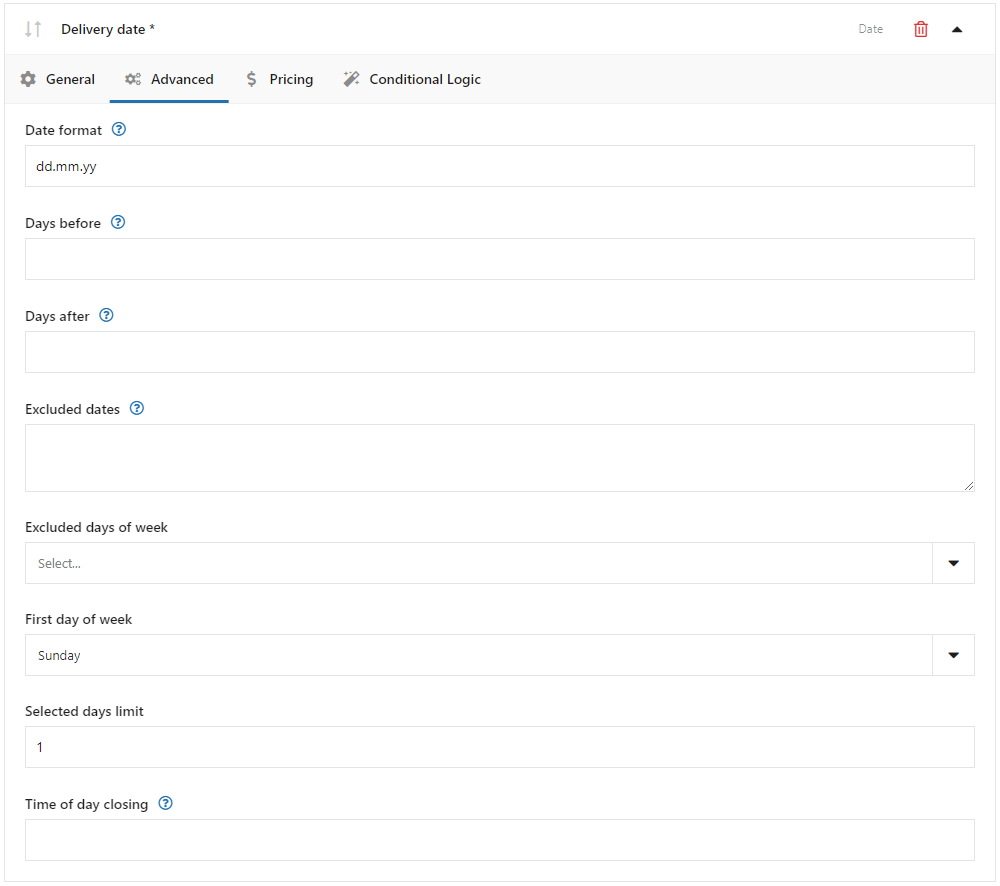
➡️ Some of the features are:
- date format
- days before
- days after
With days before and days after you can set a time range of dates available to select by a customer. It may be useful when you offer the product engraving as you need time to make it.
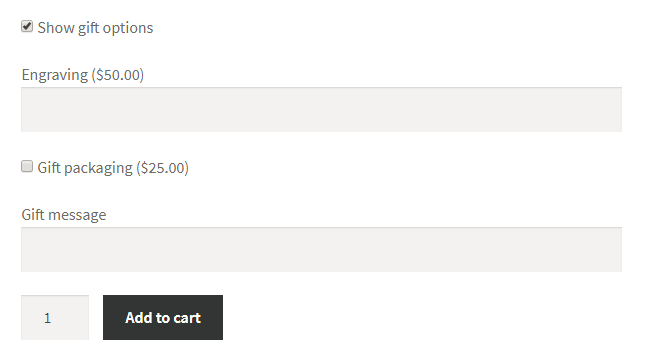
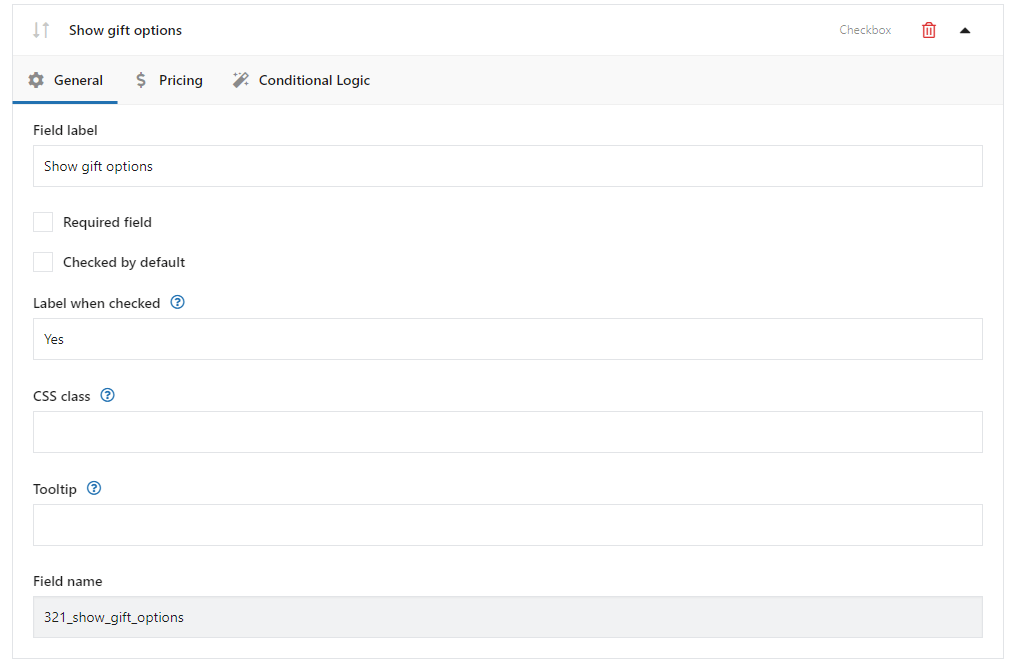
Show gift options (checkbox field)
This product field will be very important in our configuration. By default it looks like this:
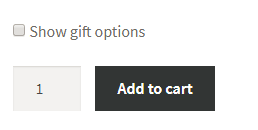
👆🏽 When a customer checks this field, new fields show up.
This is the conditional logic. However, you don't set the Conditional logic option for this field. You add the field in the normal way, and at this point you need to be worrying about the Conditional Logic Tab.
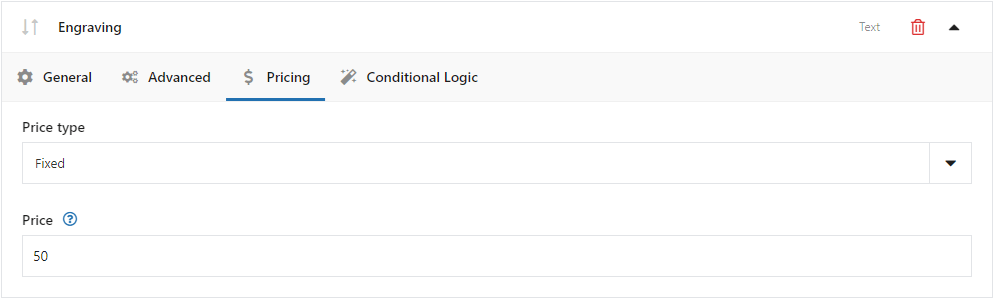
Engraving (text field)
This is a simple field where a customer can provide some text i.e. engraving.

👉🏽This field should show up only when the customer marks the Show gift options checkbox.
In this situation, you need to configure conditional logic for this field.
Start with the customization adding an extra price in the Pricing tab:
And now let's go to the Conditional Logic tab where we will add this extra feature as well:
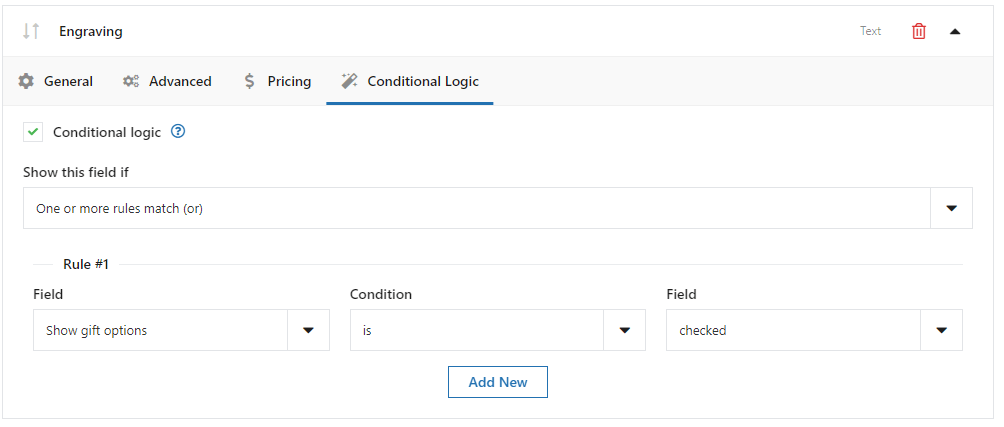
As you can see above, I marked the Conditional logic option. In the Rules, I set that this field shows up when the Show gift options field is equal to checked.
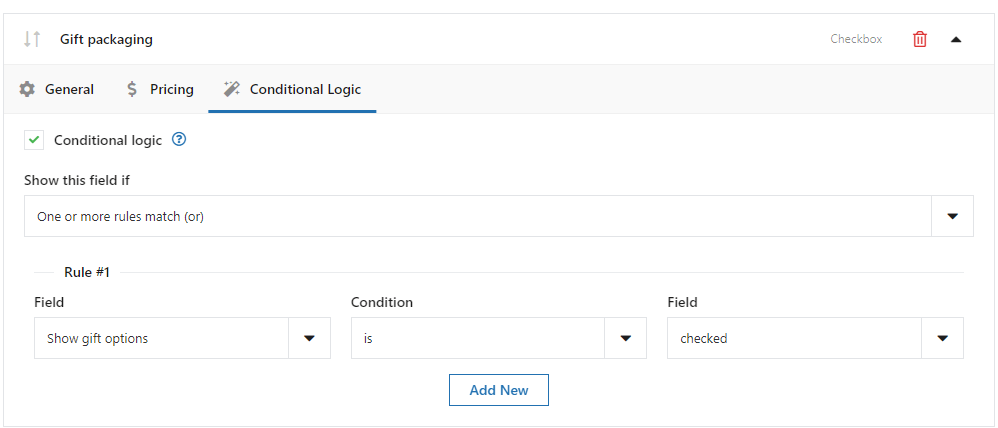
Gift packaging (checkbox field)

You need to set conditional logic for this field in the same way as above. You can also add extra pricing if you want the customer to pay extra money for the gift packaging. You already know how to add extra pricing 😉
Gift message (text field)

Finally, the last one🎉. You need to set conditional logic here, too.
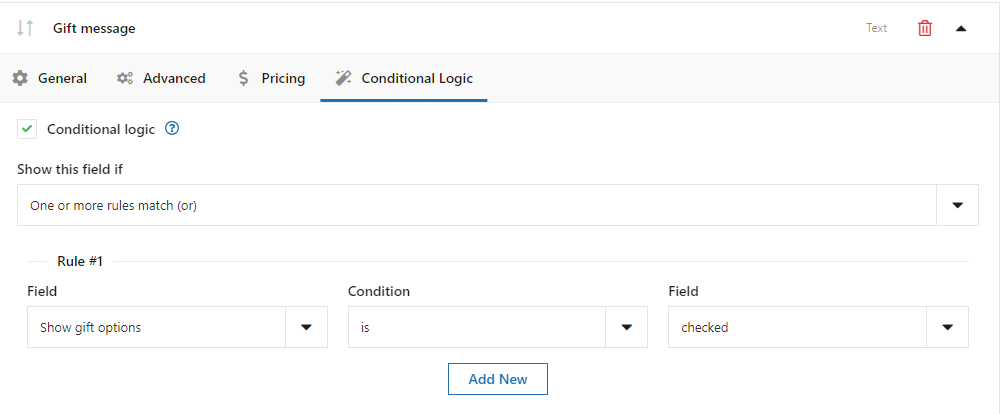
Once again, let's look at the effect we have achieved😁 :
Flexible Product Fields FREE →
All Plugins Bundle £99
20 plugins included! 1 Site for each plugin Regular updates and support Priority 1-on-1 Support 30-day money back guarantee
Add to cart or View DetailsSummary & more about the plugin
In this article, I've explained how to add WooCommerce products and then customize them with a free plugin!
You've also learned how to create your computer builder as a result of reading this WooCommerce Computer Builder Guide. I hope it helped you and that you are now ready to sell customizable products in your WooCommerce store. Are you ready to set up a computer wizard in your store?
After all, you may have some questions. Feel free to ask! Please use the comments section below😁 .
Finally, I haven't covered all the plugin's features in this article. I think that our WooCommerce Extra Product Options Guide may be interesting for you.


Leave a Reply