
In this guide, you'll learn how to configure conditional logic for checkout fields in your WooCommerce store. I'll guide you step by step through the configuration. In the end, you'll be able to configure WooCommerce checkout with conditional custom fields by yourself 🚀!
Contents
- Conditional checkout fields in WooCommerce based on:
- WooCommerce Checkout Fields Editor
- WooCommerce conditional checkout fields features
- Flexible Checkout Fields plugin fields conditional logic
- Cart conditional logic
- WooCommerce default fields conditional logic
- Conditional Logic Based on WooCommerce Shipping Methods
- Payment Method conditional logic
- Date-Based Conditional Logic in WooCommerce Checkout
- Summary: Editing WooCommerce Checkout Fields with Conditional Logic
- FAQ
- WooCommerce Conditional Logic, Custom Fields & Product Options in one plugin!
- How to Add Conditional Logic to the Country Field in WooCommerce checkout?
- Customize the WooCommerce Checkout Page: Top Tips for a Seamless Experience
- How to Add and Display WooCommerce Custom Fields on the Checkout & Order Pages
- WooCommerce Checkout Field Editor: How to Add, Edit & Remove Billing Fields
Conditional checkout fields in WooCommerce based on:
- WooCommerce default fields
- custom checkout fields
- extra product fields
- Cart rules
- User
- Shipping method
- Payment method
- or date
Have you ever wanted to hide, show or set as required some fields based on some conditions, like country, shipping or/and payment details or products in the cart? You can do it easily with Flexible Checkout Fields!
Let's set conditional checkout fields in WooCommerce with our plugin ⭐!
WooCommerce Checkout Fields Editor
To proceed with this guide you'll need a plugin because WooCommerce does not let you easily modify the WooCommerce checkout page.
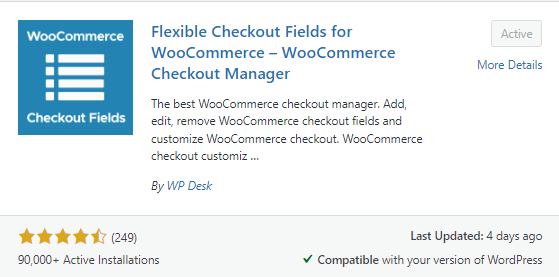
We created Flexible Checkout Fields to change that! One of the most powerful features that we developed in the plugin is the support for conditional logic (in PRO) ⭐.
But don't just take our word for it, over 80,000 WooCommerce stores worldwide use the FREE plugin daily to edit & customize their checkout page 💪. We encourage you to try the free version first before you decide to get the PRO, which supports conditional logic.
WooCommerce checkout field editor with conditional rules
WooCommerce conditionals made easy. Flexible Checkout Fields is your choice to set the custom checkout with conditional rules.
💾 Active Installations: 90,000+ | WordPress Rating:
We often add new features or fix bugs in this plugin. And people really appreciate it!
This plugin also utilizes the WordPress look & feel and is very easy to use due to the clean interface. Download the free version of Flexible Checkout Fields ➡️
Download Flexible Checkout Fields →👉🏽 Have a look at some of the plugin's features before we start:


You can download Flexible Checkout Fields for free 😊! Watch this video to see what this plugin offers you in the free version:
WooCommerce conditional checkout fields features
You can configure conditional logic in 8 ways:
- WooCommerce default fields conditional logic,
- Flexible Checkout Fields plugin fields conditional logic,
- Flexible Product Fields plugin fields conditional logic,
- Cart conditional logic,
- User conditional logic,
- Shipping method conditional logic,
- Payment method conditional logic,
- Date conditional logic.
Now, I will show you home some of them work.
Flexible Checkout Fields plugin fields conditional logic
We will demo the working of FCF conditional logic using the example of the default Woo Phone field in the Billing section and the Checkbox field added with the Flexible Checkout Fields plugin.
First, you need to create a new custom field for the checkout page added with Flexible Checkout Fields. In our case it will be a Checkbox field.
Then, select Checkbox as a field type. Set Show phone? as a label:
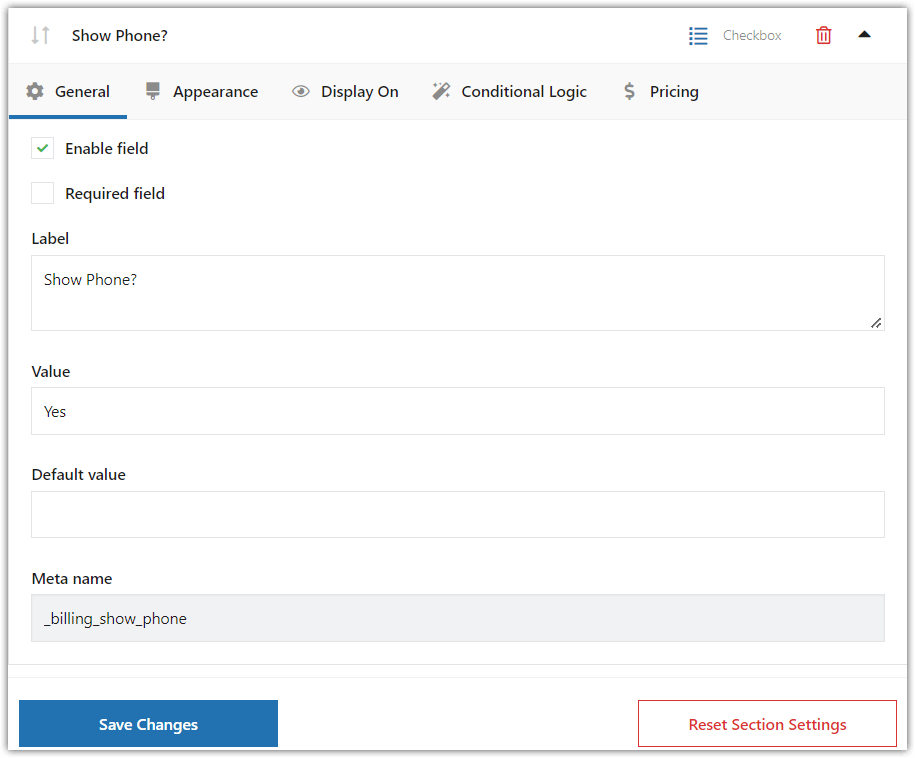
Meta name will be the name of the field in your database. You don't need to change the default one.
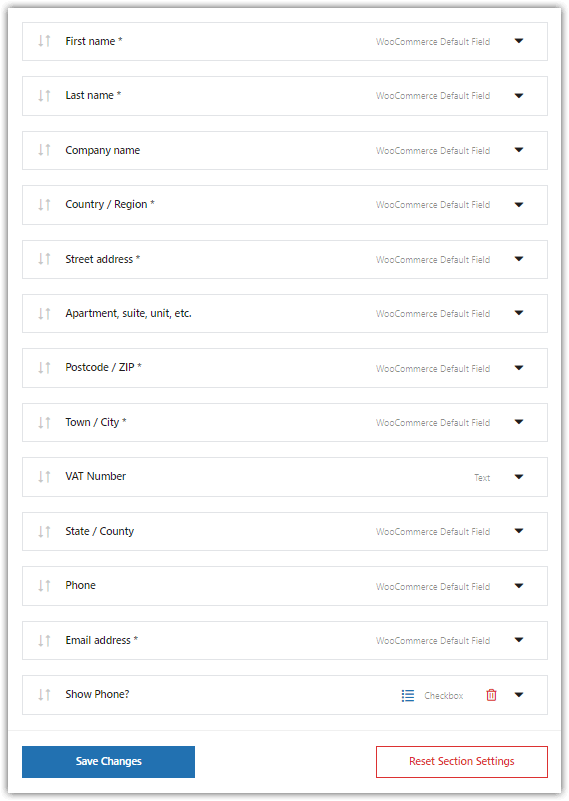
Click Add Field. Then, as you can see, the field shows up on the configuration screen:
Go to the Phone WooCommerce default field and click the Conditional logic tab.

Now you need to set the conditions for which the Show Phone? field will show up in the checkout page form. You can do this in many possible ways by adding one or more conditional groups.
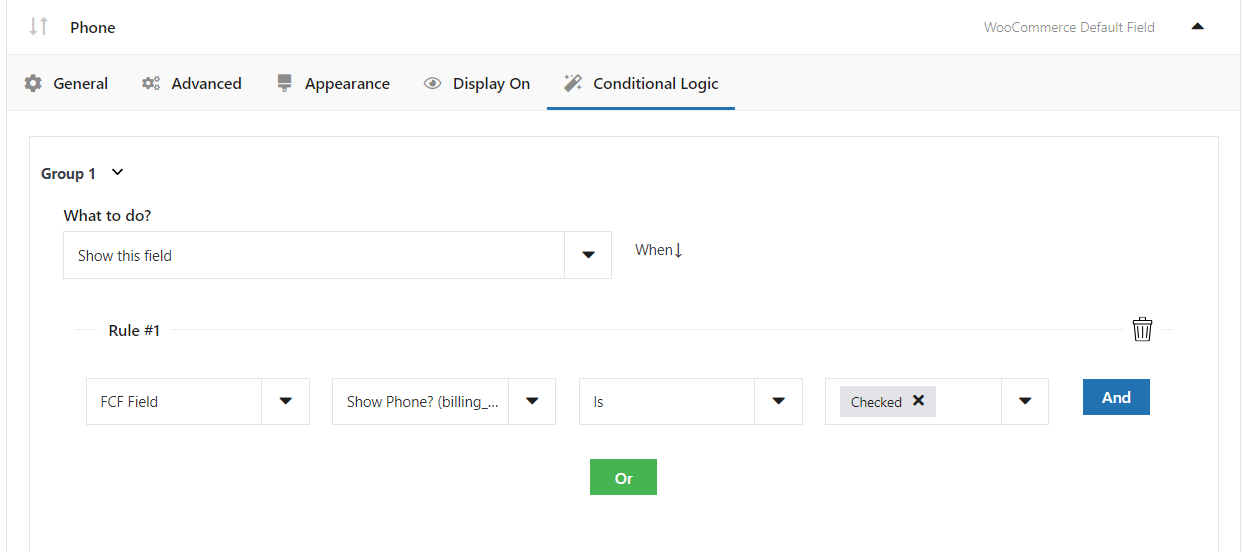
Save settings and you're ready to go.
Look:
🎉 As you can see, it works as we wanted!
Cart conditional logic
💡 Now let's see another way to set the conditional logic rules at checkout.
You can use cart conditional logic as well. This includes both the cart contains and cart value rules.
Let's say you sell T-shirts with custom projects. You want your customers to be able to describe their projects to you. Also, you need a phone number to discuss the project with them.
There is a default Phone field in checkout but maybe your customers would like to provide another phone number with an additional field. This way they can guide you directly to the Marketing Manager instead of the Accounting or Office Manager.
👉🏽 So we need such fields:
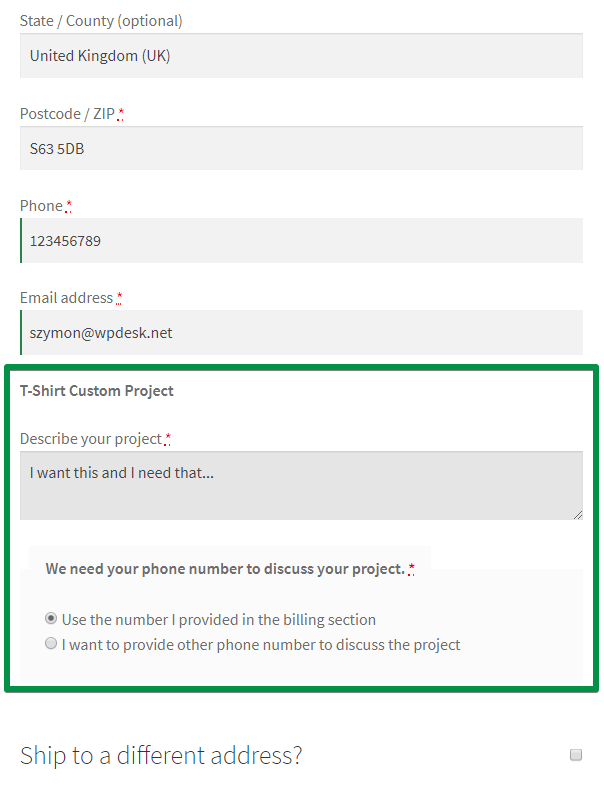
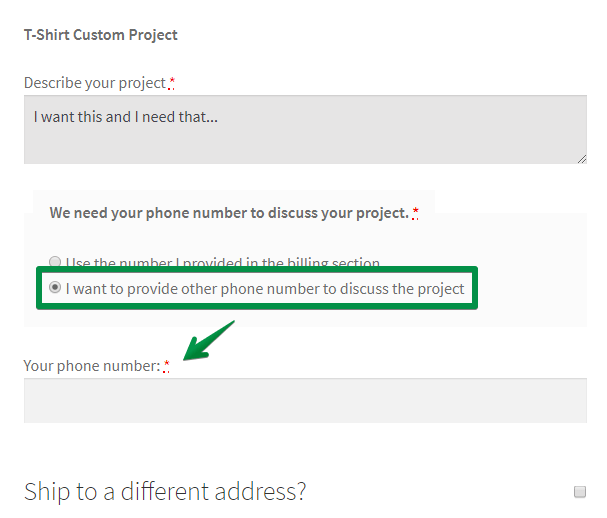
When a customer selects the second option, another phone field pops up:
How to configure these fields this way?
First, you need to add these fields:
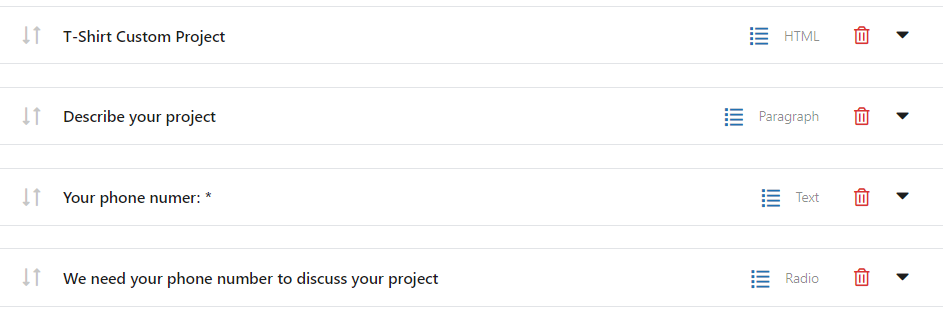
(The 'T-Shirt Custom Project' is a HTML text field. I used the <strong> HTML tag to bold it).
Then, you need to configure conditional logic:
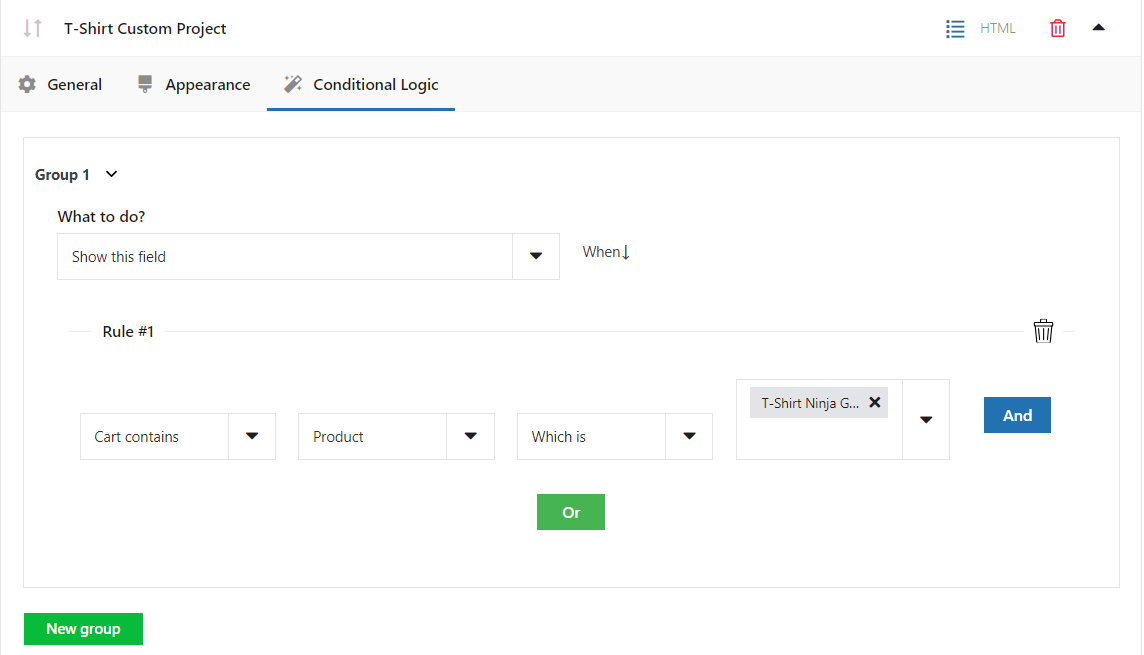
👉🏽 As you see, I configured the plugin to show the field when a cart contains a T-Shirt - Custom Project product. You need to configure conditional logic the same way for the next two fields.
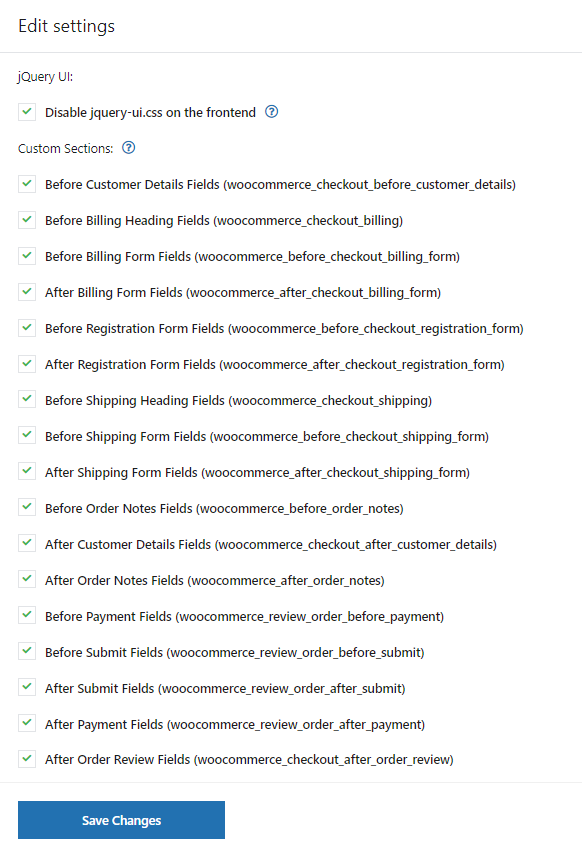
Add Checkout Fields to Specific WooCommerce Sections
But it can also create conditional product or category rules when showing custom fields to the checkout in each section.
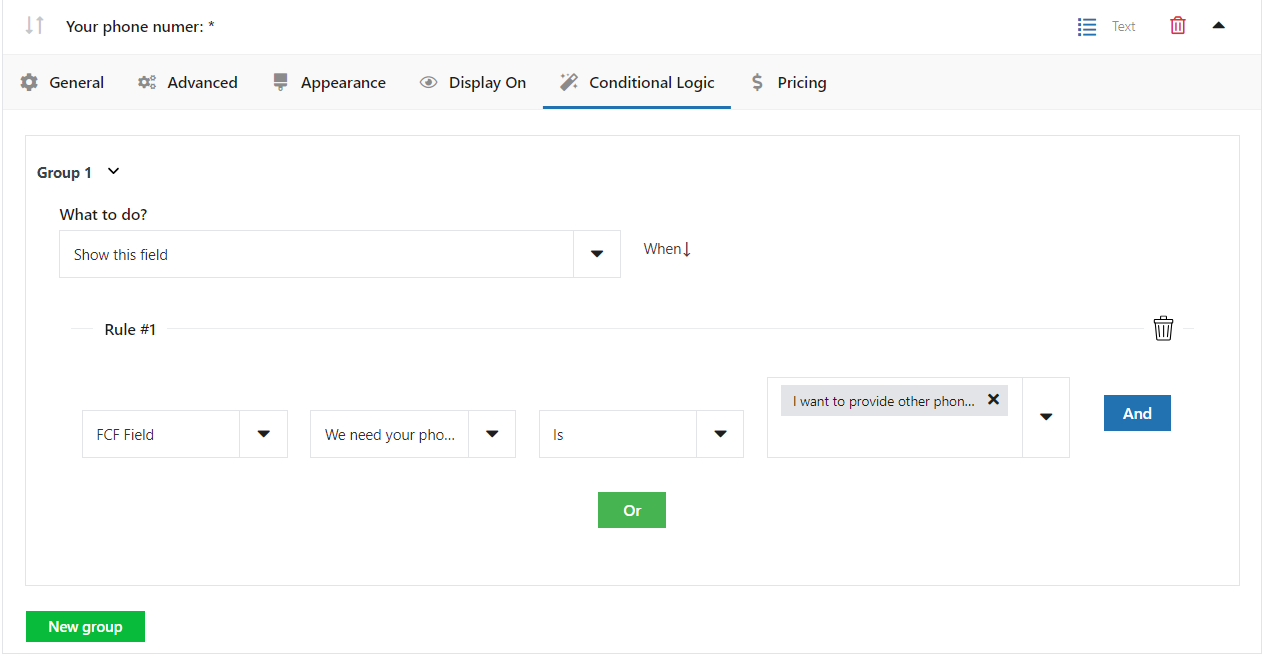
However, for the last field (Your phone number), you need to combine it with Flexible Checkout Fields conditional logic.
That's because the plugin should display this field when a customer selects a specific option in the radio field value. I mean the 'I want to provide another phone number to discuss the project' option.
👉🏽 Look:
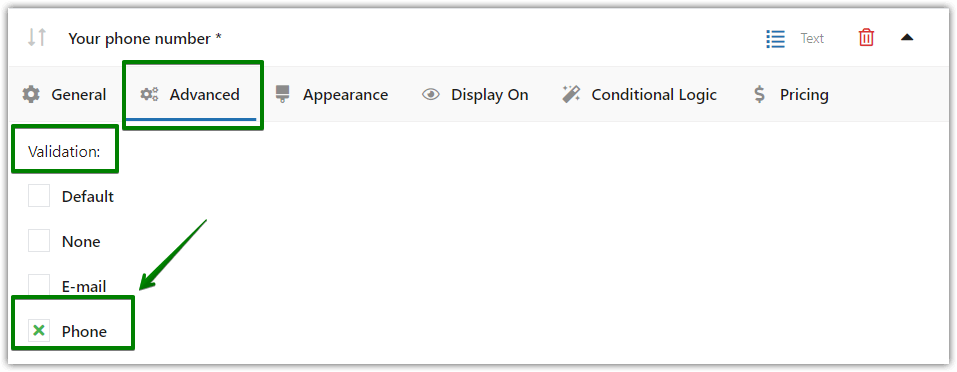
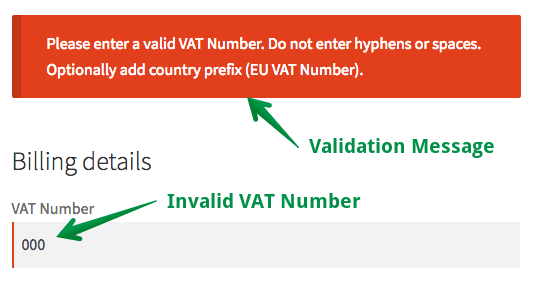
Also, you can use phone number validation for this field:
You can base your cart rules both on the contents of the cart, as in the example above, but also on its value. See a sample scenario:

WooCommerce default fields conditional logic
You can use conditional logic for the default WooCommerce Company name field as well.
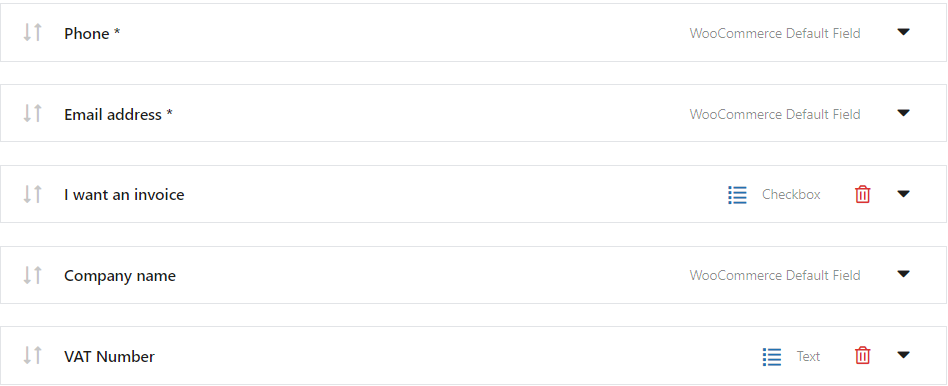
👉🏽 By default, WooCommerce shows the Company name field right after the First name and Last name fields. The field is optional. However, it's better to hide it unless a customer wants an invoice.
You can simply move the field to the bottom. Next, you can simply create an I want an invoice checkbox and a VAT Number field 😊.
Then you need to configure conditional logic for the Company name and VAT Number fields.
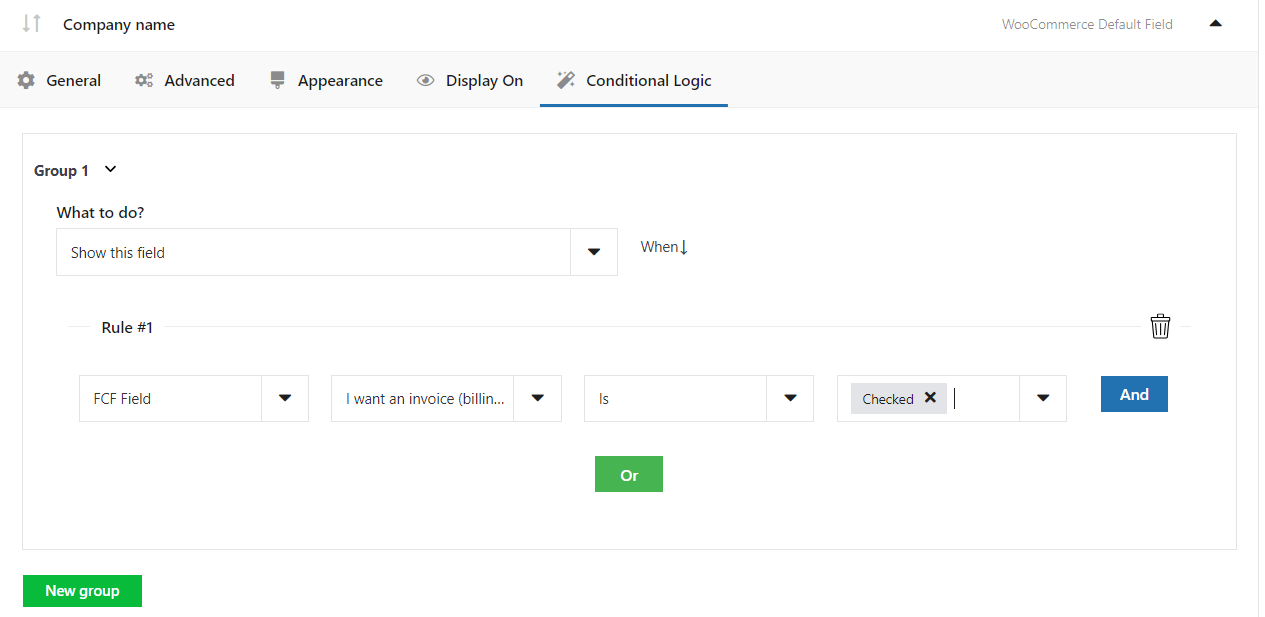
Remember to set these fields as Required.
Look at the final effect:

💡 Bonus: There is another solution.
Flexible Invoices for WooCommerce
What's more, we created the Flexible Invoices plugin for WordPress and WooCommerce. Not only it adds a VAT number field but also validates the VAT number your customers provide.
PS. Do you want to change the fields' look? Check out our CSS styling guide.
Conditional Logic Based on WooCommerce Shipping Methods
With this feature, you'll be able to show or hide checkout fields when a customer selects a certain shipping method on the checkout page. To do that, just check Enable conditional logic based on shipping methods and add a new rule.
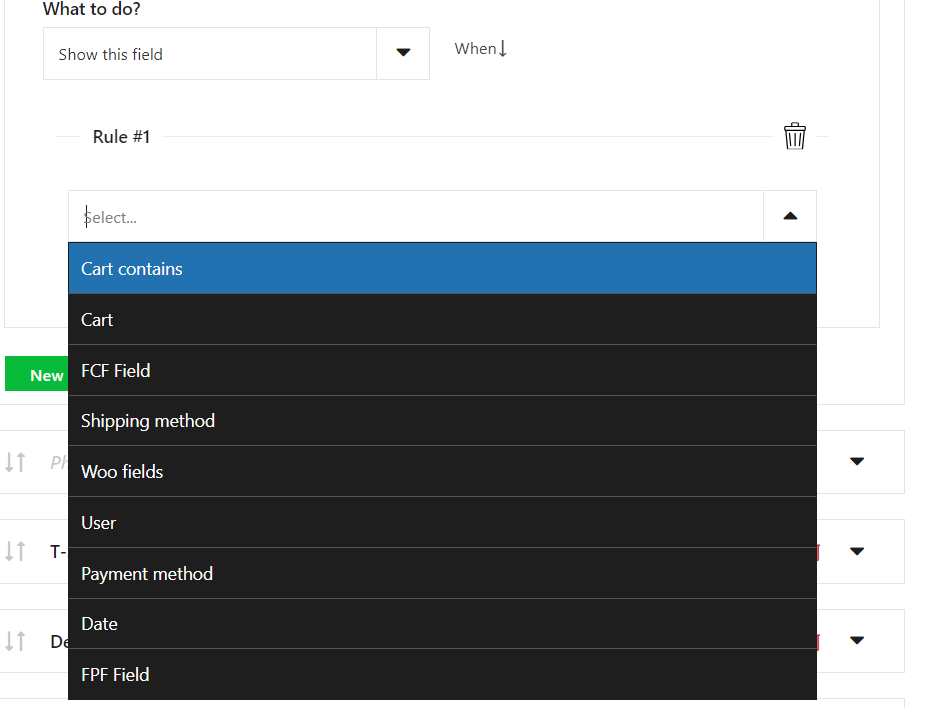
In the Rule section, you'll see a select field. First one, select the rule base, you want to set the conditional logic for. In our case, it's Shipping method. Next, you need to define your parameters, which means: the country for which you do not want to show shipping methods. Select Shipping Zone, you can choose the shipping zone that includes your shipping method. Then, in the next field, Select Shipping Method, choose your shipping methods that are included in the selected shipping zone.
Want to know more? You can read our complete guide about how to hide or show checkout fields based on the shipping method in WooCommerce ➡️.
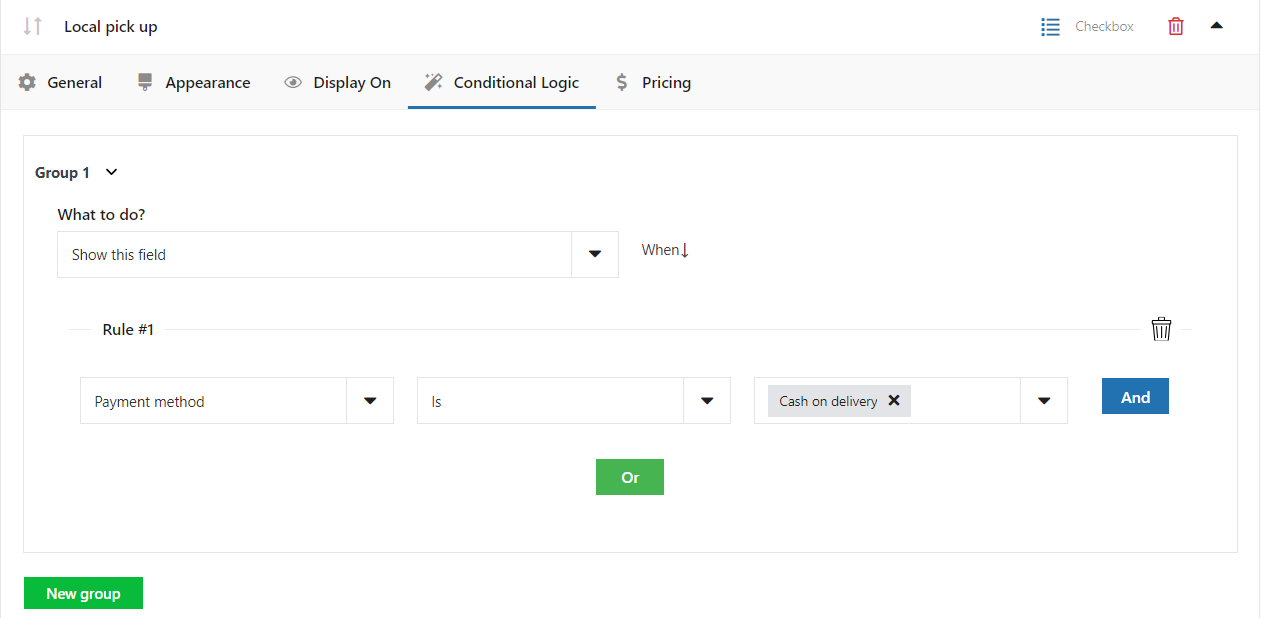
Payment Method conditional logic
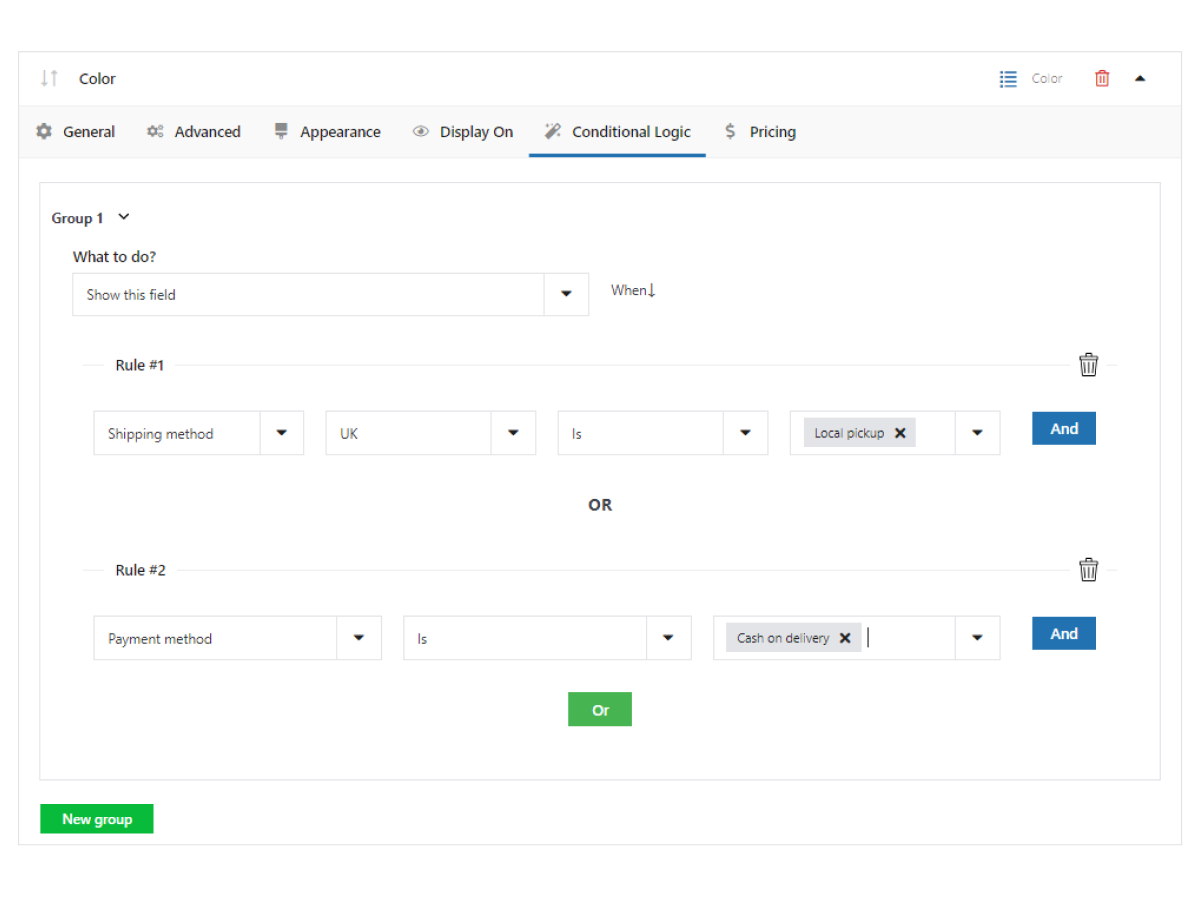
Let's see how we should proceed if we wanted to set up conditional logic dependent on shipping methods. Lets say I want to give the option to pick up the ordered product in person in case the customer wants to pay cash on delivery. To realize this scenario, I add a checkbox field with the Local pick up label and add the following rule:
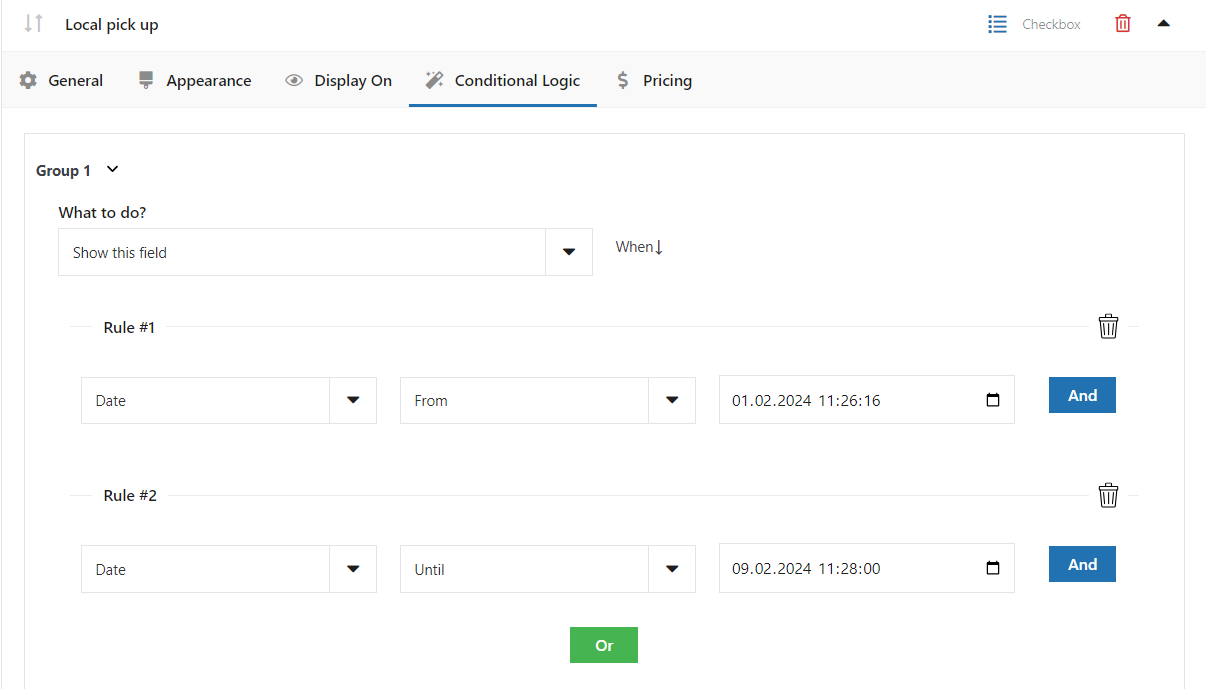
Date-Based Conditional Logic in WooCommerce Checkout
Let's test another scenario, this time it will be based on a date. Lets consider the previous example, where we configured rules for the payment method. Now, let's assume that we want to show the previous field (Local pick up, which is already based on the payment method) only if the user selects a date between, say, February 1 and February 9, 2024. To accomplish this scenario, I set the following conditions:
Summary: Editing WooCommerce Checkout Fields with Conditional Logic
In this quick guide, you have learned how to configure WooCommerce checkout conditional fields and add field to the checkout page. If you have any questions, just use the comments section below.
Now you know how to apply conditional logic for new or default checkout fields with this WooCommerce plugin.
Edit WooCommerce Checkout Fields with the Plugin
The WooCommerce checkout field editor plugin can customize checkout with additional checkout fields to streamline the checkout process. As you could see, it's easy to create a field to checkout and show fields using conditions.
Improving the WooCommerce Checkout Experience
It's possible to display existing checkout fields based on different fields, for example, WooCommerce billing or shipping fields. There are also many types of fields to choose from to make WooCommerce add such fields without coding.
Of course, the plugin allows you to edit default fields, improve your checkout with new fields, add field button, or show a field conditionally for a faster checkout experience.
So, how to add fields to the checkout page?
If you have any questions or need additional information, just use the comments section below.
You start with the default WooCommerce checkout fields.
But you may customize the checkout form with the checkout plugin.
Visit the Flexible Checkout Fields product page to see all features of the WooCommerce checkout manager plugin.
You can find a full description of all the rules on which you can base conditional logic in the Flexible Checkout Fields plugin in the plugin's documentation:
Also, download the FREE version of the WordPress plugin to customize the WooCommerce checkout experience right away.
Finally, the WooCommerce custom checkout fields plugin your free demo!
Add custom checkout page fields and edit the default checkout fields
You will be able to create conditional checkout fields or try what this WooCommerce plugin allows.
Customize checkout fields. Display checkout fields based on different checkout fields, make the field visible or required based on product, category, cart, or payment method.
Customize your checkout. Conditional checkout fields come easy with the plugin.
FAQ
How do I edit default WooCommerce checkout fields?
You can edit, hide, or reorder default checkout fields using the Flexible Checkout Fields plugin. The PRO version also enables conditional logic for these fields.
Can I show checkout fields only for specific products or categories?
Yes. With cart-based conditional logic, you can display fields only when the cart contains selected products, categories, or reaches a certain value.
Is it possible to add custom checkout fields without coding?
Yes. Flexible Checkout Fields lets you add custom inputs—like checkboxes, radio buttons, date pickers, or phone fields—directly from the WordPress admin panel.
Can I show or hide fields based on shipping or payment method?
Absolutely. The plugin supports conditional logic based on selected shipping and payment methods, allowing fields to appear only under specific choices.


Hello, besides products and product categories, the conditions work based on an attributes term? For example: I have several products with the attribute SIZE. Terms are ‘S, M, L, XL’ When someone adds the size ‘SIZE: M’ to the cart, I want to add a file upload field. Is that possible?
does this plugin able to add fees to certain fields? and disable shipping fees if certain fields is not empty?
I have the option for customers to purchase and pick up themselves. If they choose that option, their address is redundant. Could I ask for shipping method before asking for their address, and only ask for their address if they want their order shipped? The same would apply for virtual products.
Hello.
The shipping method is shown depending on the shipping zone and the shipping zone is assigned based on the address (postal code). So the postal code comes first. Then it is possible to hide fields based on shipping method.