
The WooCommerce Checkout Page is simple by default for there is no built-in option to customize the form in the WooCommerce plugin. So, how to edit, customize, and design the WooCommerce checkout page to speed it up and increase your sales thanks to your custom order form?
Contents
- How to Customize WooCommerce Checkout Page with a FREE plugin?
- WooCommerce Checkout Page by default
- Customize the WC checkout page with a free plugin
- Optimize your WooCommerce store’s checkout experience with a free plugin
- How to customize your WooCommerce Checkout page - rearrange checkout fields
- Add extra custom fields to your WooCommerce checkout page
- Remove (hide) WooCommerce checkout fields without hooks and custom code
- Required/ Optional fields in WooCommerce checkout page using the plugin
- Customize checkout notes with the best WooCommerce plugin to customize the checkout
- Show custom messages on the WooCommerce store checkout page
- Custom WooCommerce checkout page - More plugin features for checkout customization
- Optimize your checkout process - more tips
- New checkout block options
- What about product page add-ons and customization in WooCommerce?
- Customize the WooCommerce Checkout Page - Q&A
- Flexible Checkout Fields WooCommerce
- What Elements Can You Modify on the WooCommerce Checkout Page?
- What are the Best Practices for WooCommerce Checkout Optimization?
- How to Improve the Checkout Process to Reduce Abandonment?
- How to Test Different Checkout Designs for Better User Experience?
- Edit the WooCommerce checkout page - more tips
- What Metrics Should You Track After Customizing Your Checkout Page?
- Related Articles
- Customize the WooCommerce Checkout Page: Top Tips for a Seamless Experience
- WooCommerce Checkout Field Editor: How to Add, Edit & Remove Billing Fields
- How to Add and Display WooCommerce Custom Fields on the Checkout & Order Pages
- WooCommerce Checkout - Settings, Shortcode & Configuration Guide
- WooCommerce checkout add-ons: 20 plugins for better checkout
How to Customize WooCommerce Checkout Page with a FREE plugin?
Have you ever wanted to optimize the WooCommerce checkout as you've noticed some customers quit before buying?! Do you lack the checkout page customization option for WooCommerce BUT you don't know what to do next or if you do need to hire an expensive programmer?
Reduce cart abandonment with checkout field editor
👉🏽 Today, I will show you the FREE plugin to change the WooCommerce checkout form, rearrange fields, hide some of them, and add custom fields! In this article, you'll learn to customize the WooCommerce checkout page for even better store management!
Modify the form with a checkout field editor to have a WooCommerce direct checkout page. The Flexible Checkout Fields is one of the WooCommerce checkout add-ons for WooCommerce you need to customize your checkout page.
Improve checkout experience with one of WP Desk free plugins for a WooCommerce store customization.
Use checkout templates with fewer fields or add fields with the checkout manager to optimize the checkout process.
Flexible Checkout Fields WooCommerce
Customize checkout page WooCommerce. Edit, remove, or add custom fields for the WooCommerce Checkout Page. Edit WooCommerce Checkout Page easily!
Add a Custom Field to Checkout or Go to WordPress.orgWooCommerce Checkout Page by default
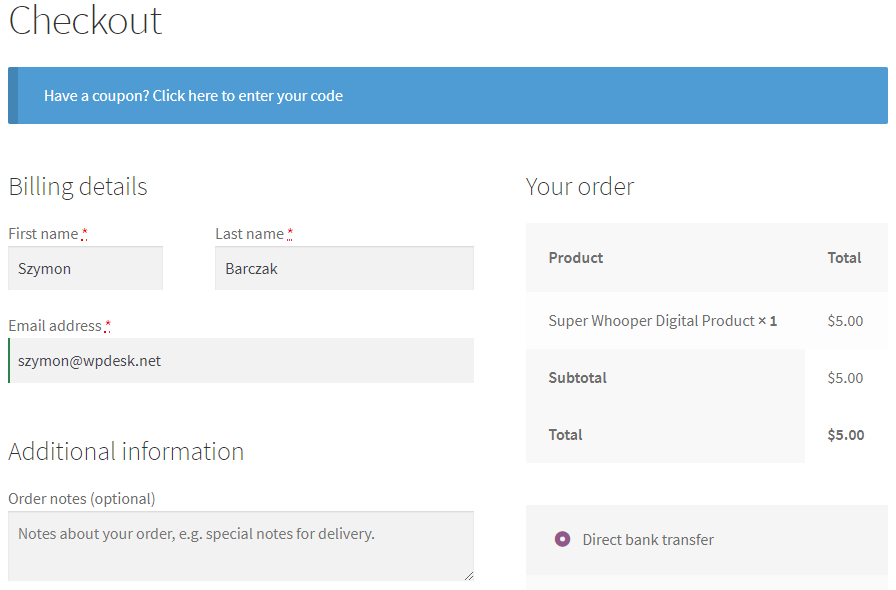
Let's start at the beginning. This is what the default checkout page looks like:
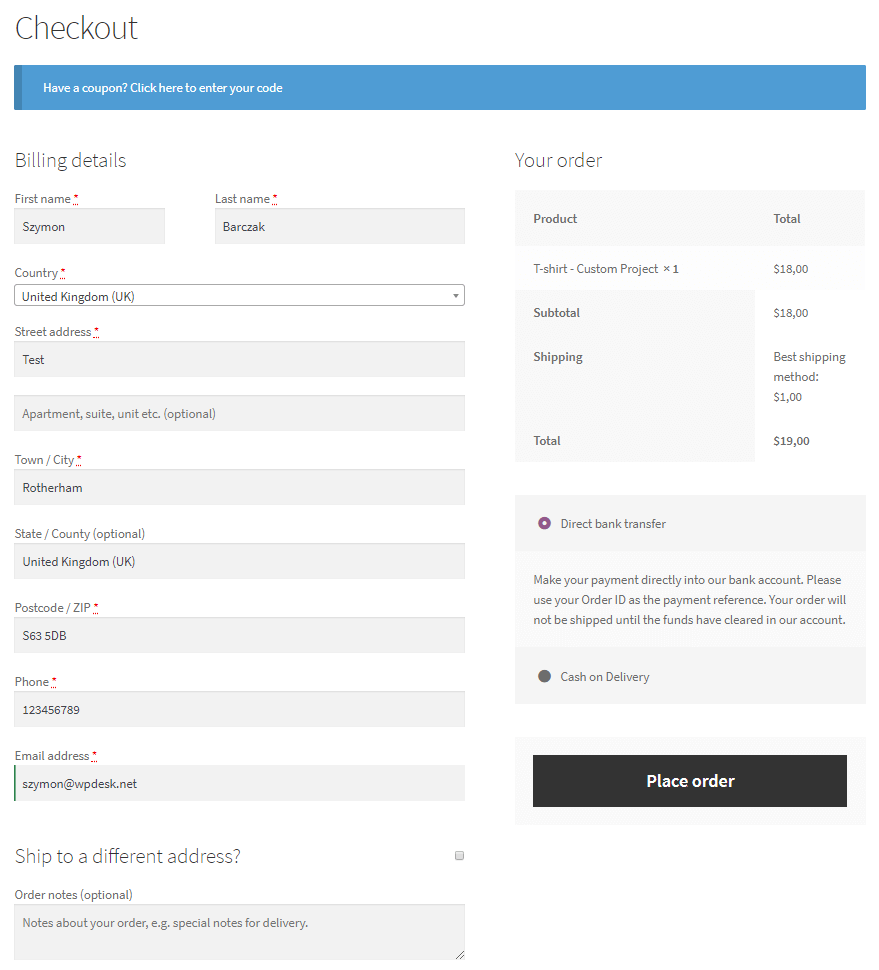
You have all the fields you may need for standard physical products.
Why build a custom WooCommerce Checkout page?
However, you may not need all the checkout fields, for example, the address fields when you sell digital products or WooCommerce subscriptions.
So, you'd like to hide them to build an optimized checkout page. The cart page can also be adjusted with cart page hooks.
For example, if you sell B2B, you need a VAT number field for your clients. So how to add the VAT number field & customize the default WooCommerce checkout page?
Adding Custom Fields to Your WooCommerce Checkout Using Code: Limitations
You can add new fields to the WooCommerce checkout form.
However, you need to take care of data sanitization and field validation.
You may find a custom code example in this article.
If you're looking for a solution that saves your time, choose a checkout field manager.
Customize the WC checkout page with a free plugin
Of course, there are more cases where you need a solution for the WooCommerce checkout page customization!
Standard WooCommerce doesn't let you personalize the checkout page. So, you need to add custom code or a checkout editor plugin for WooCommerce.
👉🏽 The best plugin to personalize the standard checkout form is Flexible Checkout Fields.
Flexible Checkout Fields WooCommerce
Customize checkout page WooCommerce. Edit, remove, or add custom fields for the WooCommerce Checkout Page. Edit WooCommerce Checkout Page easily!
Add a Custom Field to Checkout or Go to WordPress.orgWatch this short video to see what this plugin can do in its free version:
Over 80,000 stores use this plugin worldwide daily! People appreciate this plugin (with average ratings of 4.6 out of 5 stars):
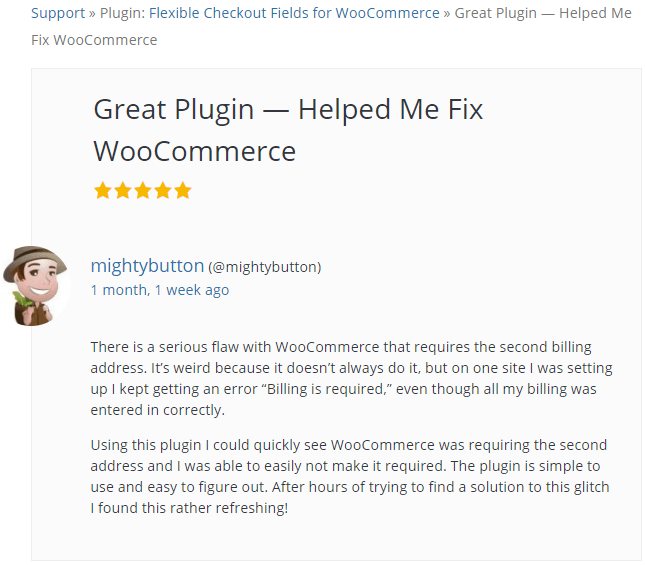
You can find a lot of positive reviews like the one above! However, you don't have to take my word for it. Download this plugin for free and check it out yourself! You will get the powerful solution to customize the WooCommerce checkout form for there are a lot of plugin features!
Optimize your WooCommerce store’s checkout experience with a free plugin
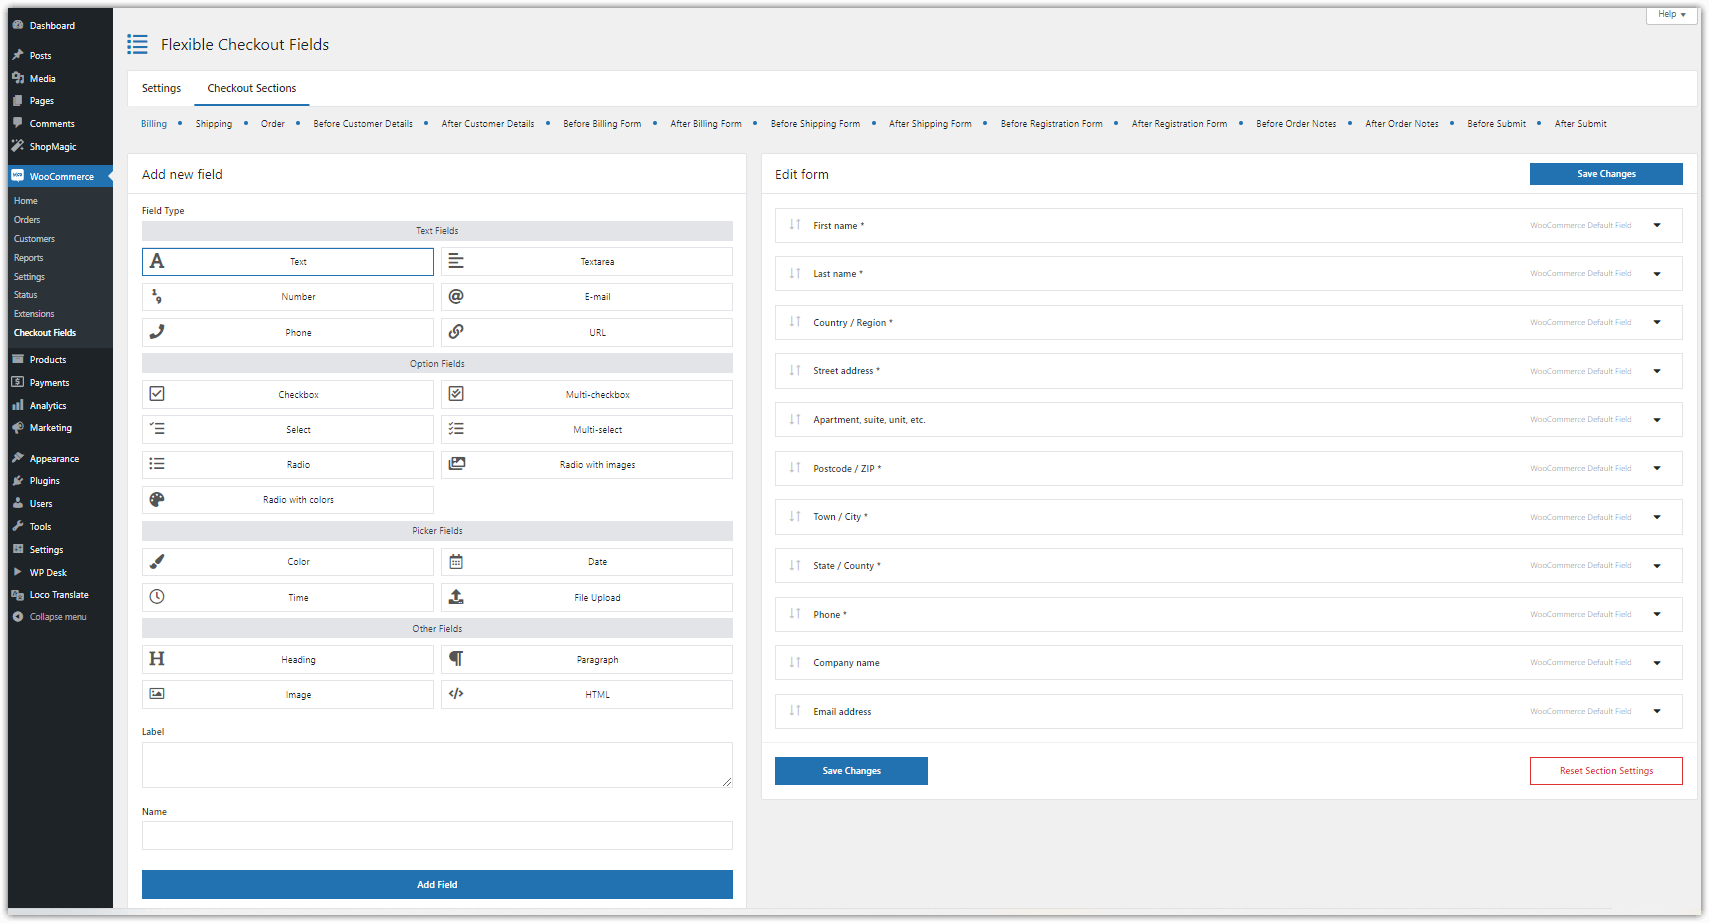
Once you install and activate the plugin, you can go to its settings. Select WooCommerce → Checkout Fields in your WordPress menu:
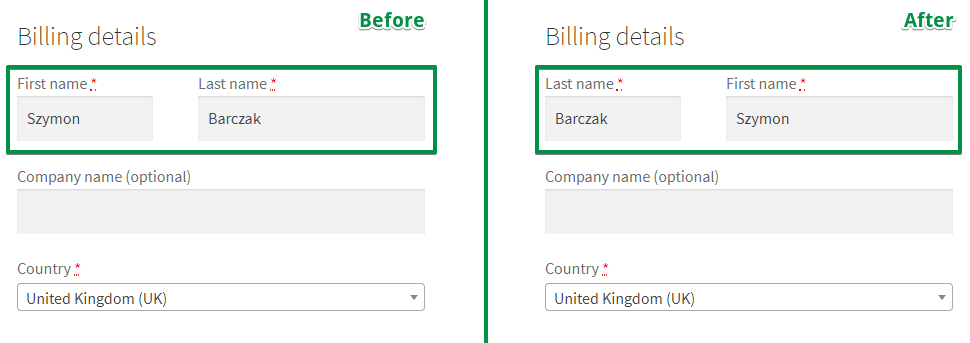
How to customize your WooCommerce Checkout page - rearrange checkout fields
👉🏽 This is one of the first things you can do with Flexible Checkout Fields.
Look at the final effect🎉:
Add extra custom fields to your WooCommerce checkout page
You may also add new fields to customize the checkout form, for example, when you need more information for your WooCommerce order processing or invoicing purposes.
👉🏽 Adding a new field to the checkout is quite simple:
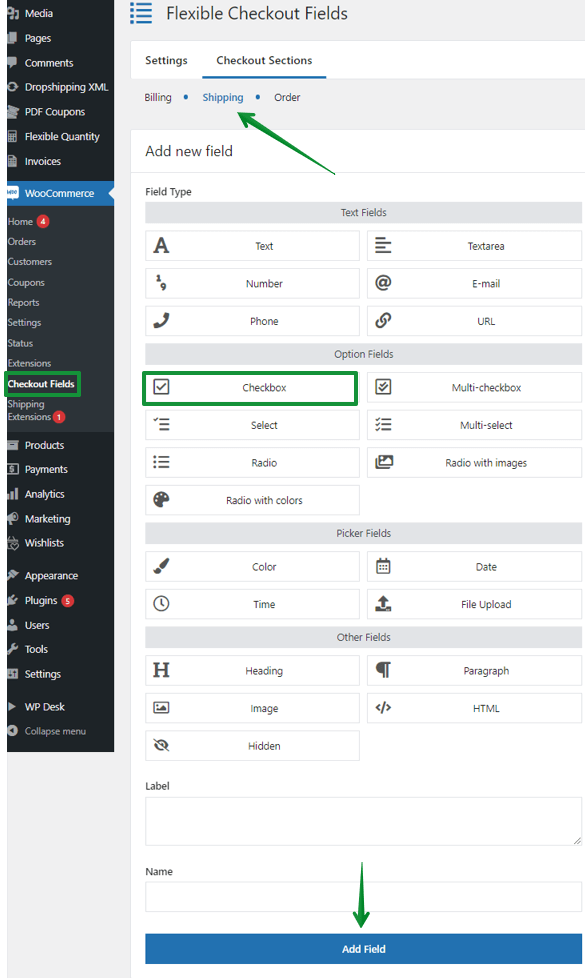
For example, a checkbox with a question about the invoice:
👉🏽 You can choose from the following field types:
- Text
- Textarea
- Number
- Phone
- URL
- Checkbox
- Color
- Headline
- Paragraph
- Image
- HTML
Remove (hide) WooCommerce checkout fields without hooks and custom code
Let's say you don't need all fields in the Billing details or the Ship to a different address section.
You can hide some of these billing or shipping fields if you need to. For example, when you want to create a custom WooCommerce checkout form for selling digital goods. Faster WooCommerce checkout means more orders received!
👉🏽 Look, this is how you can do it:
Let's disable one default WooCommerce checkout field from the Billing details.

Unmark this checkbox if you want to hide the field. So, you can hide the default WooCommerce fields!
👉🏽 With the plugin, you can change the WooCommerce checkout form page to show only the fields you want, for example:
- First name
- Last name
- Email address
Sounds incredible? Check it out:
Required/ Optional fields in WooCommerce checkout page using the plugin
You may also want to require a user to make an action on the field(s). E.g. if you sell B2B only, you would like to require customers to provide the VAT EU number for accounting purposes.
👉🏽 To make a WooCommerce checkout field required, all you have to do is to mark a 'Required Field' checkbox in the field's settings:
It's so easy! This is how you do it:
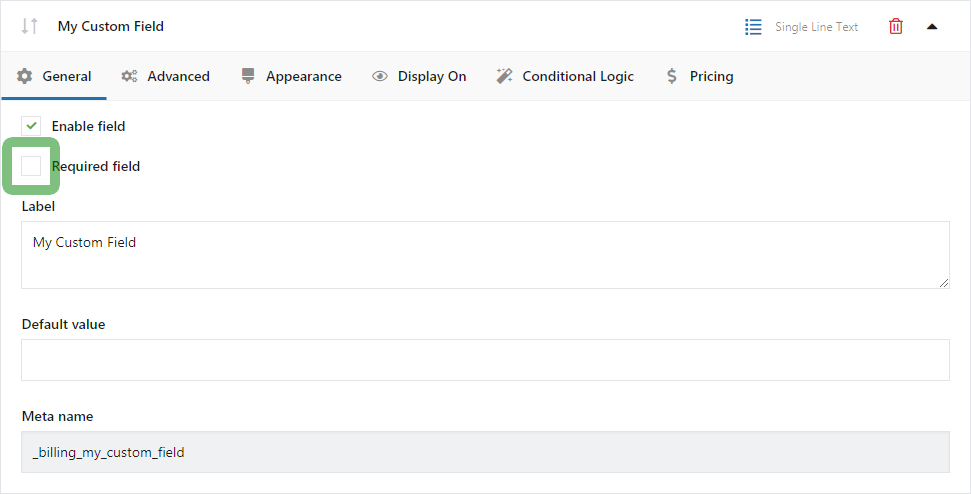
You can also unmark this checkbox. This way you can change fields to optional (non-required). That will work also for the default WooCommerce checkout fields!
Customize checkout notes with the best WooCommerce plugin to customize the checkout
By default, there is an order notes field on the WooCommerce checkout forms. It is a simple text field.

You can add many different custom fields to the checkout notes.
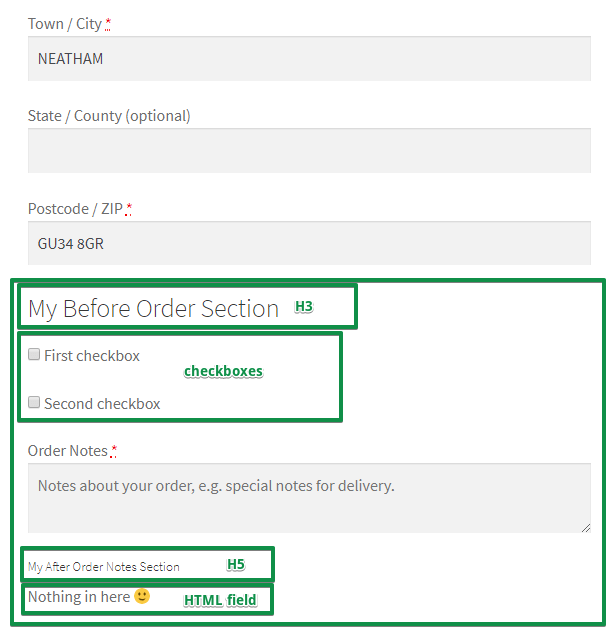
👉🏽 Just go to the Flexible Checkout Fields plugin's Settings. You can enable different custom sections there.
Enable Before and/or After Order Notes.
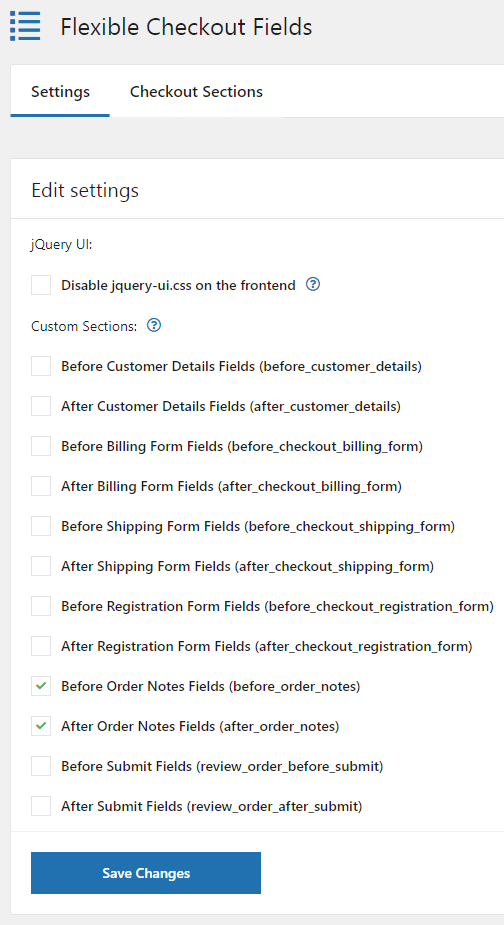
You can put any custom field you want in there.
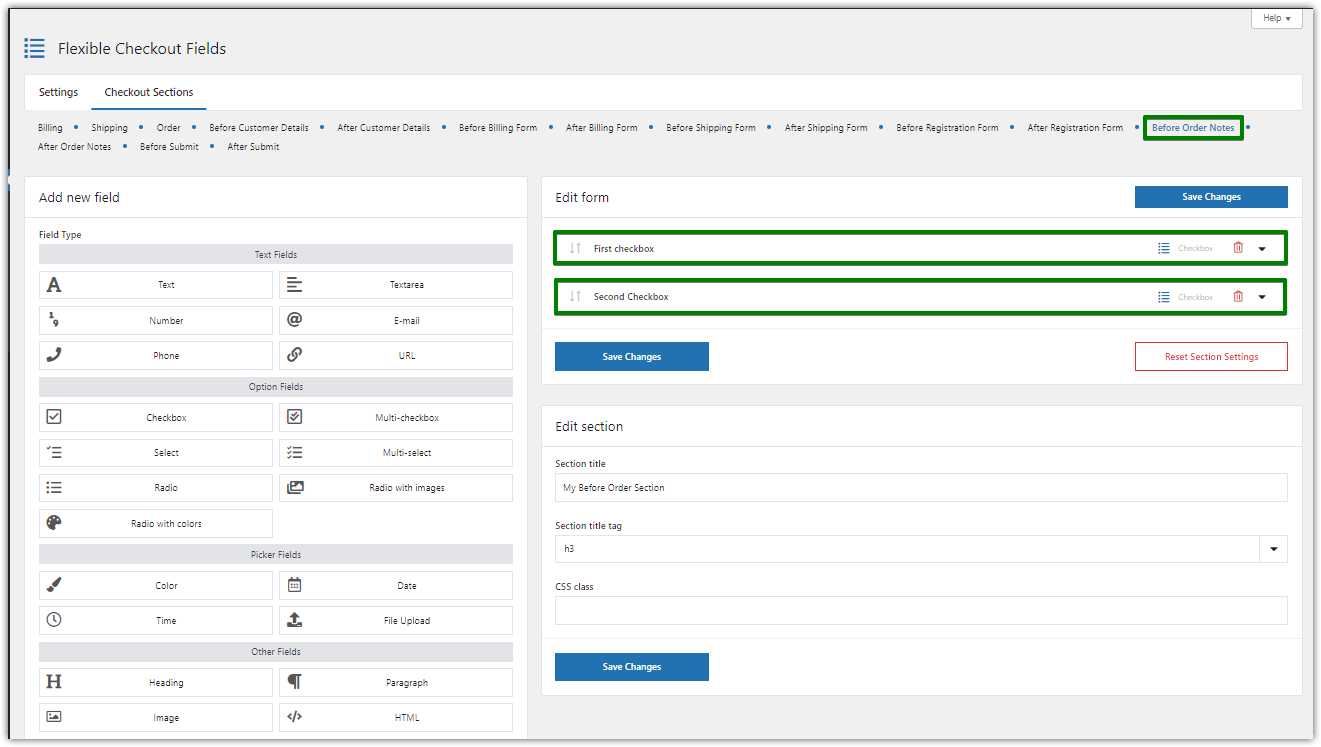
The plugin will show it before and/or after the standard order notes.
Look at the example:
Also, you can use CSS styling to change these fields' look.
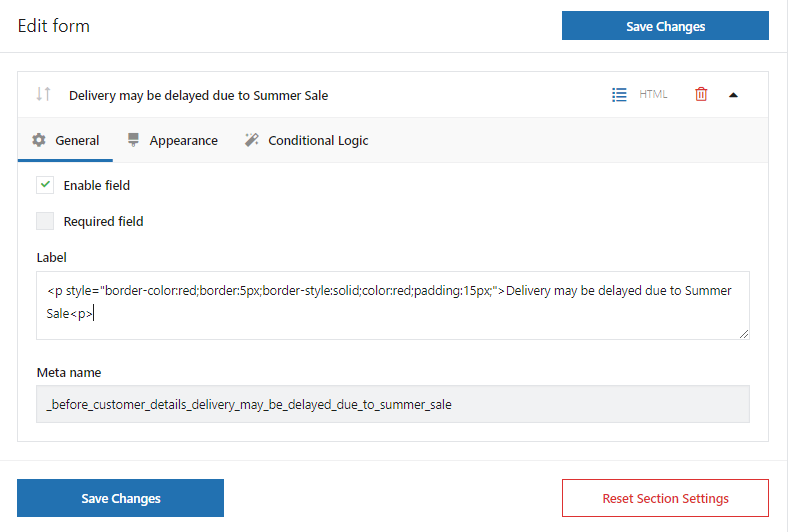
Show custom messages on the WooCommerce store checkout page
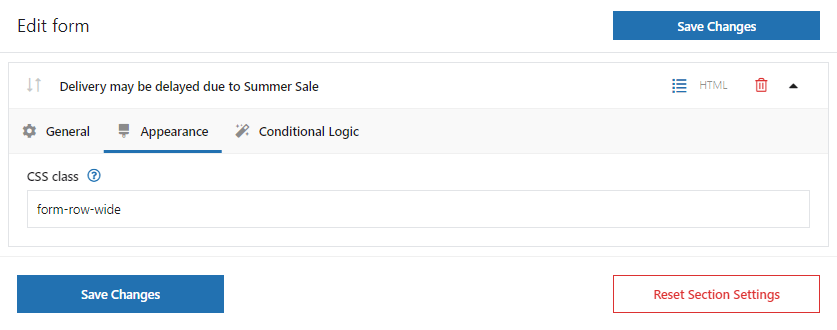
Sometimes there is a delay in processing orders (e.g. during Holidays). You may want to show a text or a custom message to your customers directly on the checkout page. It can be a simple text message like this:
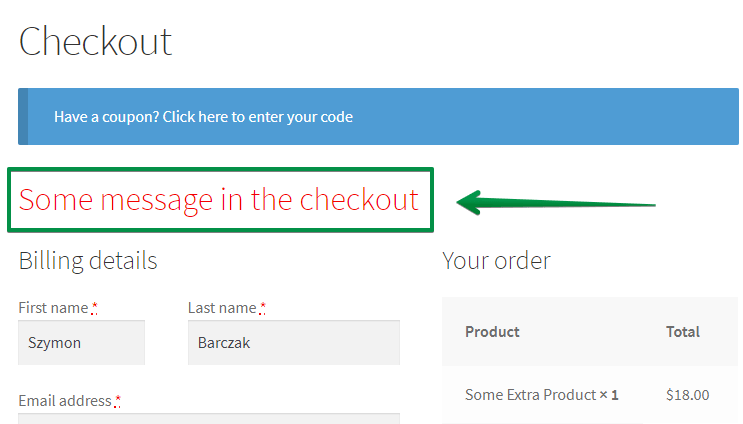
The Flexible Checkout Fields plugin lets you add any field there. It doesn't have to be a text. It may be a checkbox, a select box, or even a date picker. Put there any of Flexible Checkout Fields' custom fields.
Go to Settings and enable the Before Customer Details custom section.

Then, go to the Before Customer Details tab and add a field. Click Save Changes and you're ready!
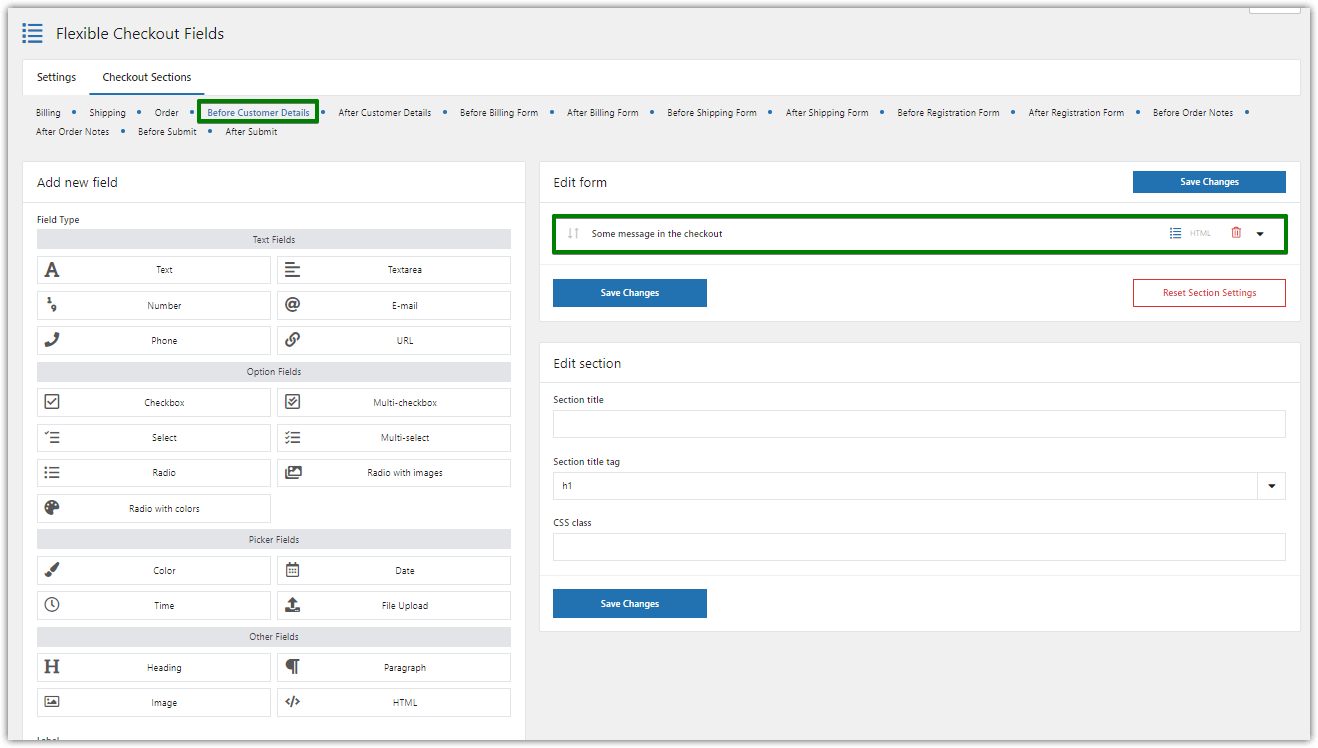
Now you have a message on the WooCommerce checkout form.
Custom WooCommerce checkout page - More plugin features for checkout customization
In this short guide, I showed you how to edit and customize your WooCommerce checkout form. Use the free plugin for WooCommerce to create the custom checkout order form & thus speed up the checkout process and get more orders!
How do you like my article? Let me know in the comments section below!
Also, you may read more about WC checkout in our WooCommerce Checkout Complete Guide →
And if you need the PRO version of the plugin to handle conditions for checkout fields, add extra fees to the checkout, or use more custom field types, and get PRO support, visit the Flexible Checkout Fields product page.
Of course, if you have any questions contact us!
Get the checkout field manager for WooCommerce checkout flow optimization.
Optimize your checkout process - more tips
You can use free or paid options to your checkout at WooCommerce site with a plugin to help enhance core WooCommerce features.
Flexible Checkout Fields for WooCommerce allows shop page improvements at checkout.
So, it means you may optimize your checkout page for free.
Flexible Checkout Fields WooCommerce
Customize checkout page WooCommerce. Edit, remove, or add custom fields for the WooCommerce Checkout Page. Edit WooCommerce Checkout Page easily!
Add a Custom Field to Checkout or Go to WordPress.orgThis WooCommerce integration may turn any page using native WooCommerce checkout features and it also supports WooCommerce subscriptions.
New checkout block options
Additional custom fields displayed on the checkout may help WooCommerce store owners including you. For block checkout you can use Checkout Fields for Blocks (also free WP Desk plugin).
Moreover, your theme or template may have some features to adjust WooCommerce, but they may lack cart and checkout options.
What's more, remember that you can transfer users directly to the checkout page with a custom function.
What about product page add-ons and customization in WooCommerce?
Are looking for add-ons like these for product personalization?
WP Desk has built a plugin for easier product selection and checkout forms optimization (with compatibility and conditional logic options).
Flexible Product Fields WooCommerce
Customize checkout page WooCommerce. Edit, remove, or add custom fields for the WooCommerce Checkout Page. Edit WooCommerce Checkout Page easily!
Add a Custom Field to Checkout or Go to WordPress.orgAs you can see product, cart and checkout page optimization come easy with professional plugins for WooCommerce.
Customize the WooCommerce Checkout Page - Q&A
If you use block-based checkout you may choose the free Checkout Fields for Blocks plugin.
However, using the classic checkout form WooCommerce offers can make the checkout process adjustable. How? For example, by removing, rearranging, or adding fields on your checkout to enhance checkout experience for your customers.
Now, navigate to WooCommerce, open the Plugins tab, and search for Flexible Checkout Fields. You may also download this WooCommerce checkout field editor from WP Desk below:
Flexible Checkout Fields WooCommerce
Customize checkout page WooCommerce. Edit, remove, or add custom fields for the WooCommerce Checkout Page. Edit WooCommerce Checkout Page easily!
Add a Custom Field to Checkout or Go to WordPress.orgThe free version of the plugin allows managing WooCommerce checkout form from a single page settings.
Show fields on the checkout page and manage checkout easily.
Also, the extension can validate the checkout fields.
What Elements Can You Modify on the WooCommerce Checkout Page?
First, on the WooCommerce checkout page, you can customize the layout and design, such as changing colors, fonts, and button styles.
Additionally, you can add or remove fields to streamline the checkout process, ensuring that customers only provide essential information.
Furthermore, you can integrate custom messaging or promotional offers to encourage upsells or provide clarity on shipping and payment options.
Finally, you may delete some billing fields and shipping section to speed up the checkout.
What are the Best Practices for WooCommerce Checkout Optimization?
Lower the number of fields required. Use clear, concise labels.
Consider a guest checkout option that can significantly reduce the cart abandonment rate.
Why? Because, it allows customers to complete their purchases quickly without creating an account.
Next, improve user experience, for example, with security badges and customer reviews. It may enhance credibility and reassure buyers during the checkout process.
Finally, implement mobile-friendly design so the checkout works seamlessly across all devices.
How to Improve the Checkout Process to Reduce Abandonment?
Make the form navigation simpler (with fewer fields). Turn on guest checkout (in WooCommerce → Settings → Accounts & Privacy).
Also, clearly display shipping costs, taxes, and delivery times early in the process to avoid surprises that can lead to cart abandonment.
Additionally, provide multiple payment options and ensure the checkout page is mobile-friendly.
Finally, offer checkout discounts to encourage completion of purchases.
How to Test Different Checkout Designs for Better User Experience?
Start by creating prototypes of each design option to visualize the layout and functionality.
Next, conduct usability testing to gather feedback on user experiences, for example, using heatmaps or recording.
That can help identify any pain points during the checkout process.
Analyze conversion rates and overall satisfaction for each design or existing checkout form.
Try to continuously optimize the checkout process for better usability and sales.
Edit the WooCommerce checkout page - more tips
First, you may add custom checkout experience by lowering the page load time.
Secondly, you can add custom fields to your checkout page (use a plugin or add custom code to functions.php). Using a free WooCommerce extension is the way to customize the WooCommerce checkout without writing code snippets.
What's more, the plugin allows adding different types of custom checkout fields to design your checkout without coding.
For example, you can think about a new checkout page template (use a plugin to customize fields), multi-step checkout, or one-page checkout.
Add fields to your checkout to edit the WooCommerce checkout page's style and template.
What Metrics Should You Track After Customizing Your Checkout Page?
After customizing your checkout page, it's essential to track conversion rates.
You can monitor cart abandonment rates, time spent on the checkout page and click-through rates for payment options. It can help you identify areas for further improvement.
Finally, you may track customer feedback through surveys or reviews to understand user satisfaction and identify any complaints about the custom cart and checkout process.


hi, my url https://shopzclub.com i am using woocommerce theme, and i just succeeded integrating Paypal to my website. then, i got these problems; 1) the Paypal button appeared on ‘cart’ page, which not appropriate. it supposed to appear on ‘Checkout’ page (which i haven’t constructed yet). So, how to hide the paypal button on ‘cart’ page? And can i use Flexible checkout field plugin to construct the checkout page. If not, how to do it? Sorry.. i am not good in coding and technical 2) if I decided to skip the checkout page, how to hide the ‘checkout’ button and ‘proceed to checkout button’ in minicart and main cart page? Currently, the paypal button did appear, but it is out of position. how to fix it? Really sorry, i don’t know where to get help… got to post it here.. hopefully anyone can help. thanks again.
Hello Danny. The best way to receive help with your problem will be asking on WooCommerce’s support: https://wordpress.org/support/plugin/woocommerce/
Do you know if this plugin can setup the checkout like the NordVPN checkout. I really like how clean it is and how the payment options are on the left. In my current checkout my AmazonPay button is 10 miles away from the other options and it’s just not very clean. Please checkout the NordVPN checkout page and let me know if I can arrange my checkout like that with this plugin. Thank you.
Hello Andre.
The FCF plugin is used to edit form fields but not to edit the entire Checkout page. With its help it is possible to add or remove fields. But it will not change the website design. The appearance of the page (division into columns etc.) depends on the template settings.